 |
|
 06-01-2016, 07:45 PM
|
#281
|
|
Senior Member
Join Date: Jun 2015
Location: smithville, ont.
Posts: 2,682
|
Quote:
Originally Posted by norty1

I'm there now without the water bed.
|
Lol!
I can hear the windows even shift against the rubber seals, the big slide really does some groaning and popping.
__________________
2016 North Point 341RLTS
520watts of solar. Morningstar MPPT
4 6volt 235ah Surrette batteries
2017 F-350 Platinum CC SRW
|

|

|
|
06-02-2016, 05:19 AM
|
#282
|
|
Senior Member
Join Date: Sep 2015
Location: North Greenbush, NY
Posts: 752
|
Quote:
Originally Posted by Redbird7
Has anyone wanted a 2nd monitor panel next to the dumping station on the driver's side? Has anyone tried this? Putting this on my mod list. I would like to know fresh water level and waste tank levels when outside filling and dumping. Should not be too hard. What is everyones opinion?
|
Great idea! We do this on fire apparatus. A vertical green, blue, yellow, red light still, one on each side of the apparatus, indicating F, ¾, ½, ¼, no lights is E for the water tank. This way the operator, the company officer, or the incident commander can see water status at just a glance.
I'd be very interested in making this mod!
|

|
|
|
06-03-2016, 07:08 PM
|
#283
|
|
Member
Join Date: Mar 2016
Location: Key West
Posts: 41
|
Dropped a much better ceiling fan in today.
|
|
|
|
|
06-03-2016, 07:09 PM
|
#284
|
|
Member
Join Date: Mar 2016
Location: Key West
Posts: 41
|
Also, added two more lifelines to the solar, puts it at 600 amp hours. (I did not install the solar panels)
|
|
|
|
|
06-03-2016, 08:18 PM
|
#285
|
|
Senior Member
Join Date: Jan 2016
Location: Magnolia
Posts: 4,841
|
Quote:
Originally Posted by Dustin.Ford
Dropped a much better ceiling fan in today.
|
Looks good Dustin! Is that a hunter fan?
Sent from my iPhone using Tapatalk
__________________
2016 North Point 377 RLBH, with a few mods, disc brakes, shocks, Sailun g rated tires, wet bolts
2014 Ford F350 Platinum sold
2017 Ford F350 Lariat, CC, 6.7PSD, DRW, Trailer Saver BD3 hitch
|
|
|
|
|
06-04-2016, 05:24 AM
|
#286
|
|
Member
Join Date: Mar 2016
Location: Key West
Posts: 41
|
Yea sir, it is. But, learned a lesson. Though this puts out a good push of air, apparently the same motor is used regardless of 4 or 5 bladed fans. So if I had gotten a good 4 bladed fan it would have drawn less off the motor and quite possibly have been able to push air even better.
|
|
|
|
|
06-04-2016, 05:48 AM
|
#287
|
|
Senior Member
Join Date: Jan 2016
Location: Magnolia
Posts: 4,841
|
Didn't I see that fan at Home Depot? I was looking at fans a couple days ago and almost got one but I was on the fence about what color to get
Sent from my iPhone using Tapatalk
__________________
2016 North Point 377 RLBH, with a few mods, disc brakes, shocks, Sailun g rated tires, wet bolts
2014 Ford F350 Platinum sold
2017 Ford F350 Lariat, CC, 6.7PSD, DRW, Trailer Saver BD3 hitch
|
|
|
|
|
06-04-2016, 06:27 AM
|
#288
|
|
Member
Join Date: Mar 2016
Location: Key West
Posts: 41
|
Same. Went with the darker color to bring out the darker spots in then woodwork and floor.
|
|
|
|
|
06-04-2016, 02:05 PM
|
#289
|
|
Senior Member
Join Date: Jan 2016
Location: Magnolia
Posts: 4,841
|
I need to consult with the wife. Not sure if she wants the brushed nickel or the bronze finish. I'd prefer the bronze but she saw yours and seems to like the nickel
Sent from my iPhone using Tapatalk
__________________
2016 North Point 377 RLBH, with a few mods, disc brakes, shocks, Sailun g rated tires, wet bolts
2014 Ford F350 Platinum sold
2017 Ford F350 Lariat, CC, 6.7PSD, DRW, Trailer Saver BD3 hitch
|
|
|
|
|
06-04-2016, 04:45 PM
|
#290
|
|
Senior Member
Join Date: Jan 2015
Location: DFW
Posts: 3,493
|
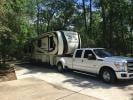
Picked her up this morning from the dealership after the some of the warranty repairs were supposedly completed.
So I took it home and put 3 Maxair II vent covers on the roof. I put the smoked black on the kitchen and bathroom. My daughter wanted the black over the loft where she sleeps to keep it darker. Here's the before and after. If you look at the side view picture you can see where the dealership removed the bottom decal due to a scratch, but never bothered to replace it...I forgot to check that and didn't notice until we were at the house...Oh well! At least we can go camping again!
__________________
Dan
'24 GMC 2500 AT4X AEV Edition
|
|
|
|
|
06-05-2016, 03:21 AM
|
#291
|
|
Member
Join Date: Mar 2016
Location: Key West
Posts: 41
|
Yeah I head reservations about the nickel as well. But once it was installed (discarded the light kit) I was happy with the appearance.
|
|
|
|
|
06-06-2016, 10:28 PM
|
#292
|
|
Junior Member
Join Date: Jun 2016
Location: El Paso
Posts: 4
|
Washer Dryer install
Hey all,
First time ever posting in a forum, so sorry if this ends up in a weird place. Just wanted to offer up my help when it came to self install of a washer/dryer in the 377. I was beyond frustrated with the lack of information out there to help, and looked for a long time on here only to find similar frustration with self install of the dryer vent. One aspect should not prevent people from being able to install things themselves! So after much deliberation and a lot of luck, I just went for it. So here is my quick run down of the whole install:
1. Dryer Vent. The self install dryer vent seems to be the biggest thing tripping people up. It was my biggest leap of faith, and paid off! I ended up guessing where i wanted the vent to go. I chose left of the drainage pipe. Hopefully these photos attach so you all can see. I started carefully with maybe a 3/8" drill bit and did an exploratory hole. I went until i hit foam, then attached the coring bit and used it to make an outline of the proposed hole. I then did test holes all around the perimeter to test for studs and supports and was met with success!! I actually believe (dont quote me) that there may not be studs in that entire area! long story short i was able to drill the hole for the vent all the way through to the outside.


2. Vent kit. We chose a splendide 2100xc washer dryer combo, which has available vent kits for purchase. With the hole now made, it was pretty easy to mount the vent from the outside and secure it with the included screws. I ran a generous bead of silicon sealant/adhesive to help with stability and add to weather proofing. Then i attached the white cover using the same method, and plenty of sealant. The location of the hole was perfect because it lined up with the vent exhaust on the dryer, and also left room for the outter cover to be mounted but not interfere with the trim near the nose of the trailer!


3. Install washer. Once the vent is in place, all the other hookups are normal and super easy. Be careful moving the machine into the area as it super tight. I believe I accidentally cracked the drainage pipe because water is leaking out when the unit drains. Looking for a solution to that, but dont worry that is definitely due to my spastic nature! Hope this helped! I took the risk to see if it could be done because i know it has been causing a lot of frustration, and frankly you should always be able to do things around the house! Thanks for all the other projects you guys have posted, now gives me things to drive my wife crazy about!!!


|
|
|
|
|
06-07-2016, 04:53 AM
|
#293
|
|
Senior Member
Join Date: Jun 2015
Location: smithville, ont.
Posts: 2,682
|
Pretty good first post Raptor
I think you should make that a new thread so others find it easy.
__________________
2016 North Point 341RLTS
520watts of solar. Morningstar MPPT
4 6volt 235ah Surrette batteries
2017 F-350 Platinum CC SRW
|
|
|
|
|
06-07-2016, 05:32 AM
|
#294
|
|
Senior Member
Join Date: Sep 2015
Location: North Greenbush, NY
Posts: 752
|
Great post! Thank you for the details and photos! Anyone considering adding the W/D combo really benifits from this.
And Welcome to the forum! If this post is indicative, you will quickly become one of the guru's that we all watch for new ideas!!
__________________
Be Safe, and Everyone Goes Home,
Rick
2014 RAM Laramie 2500 w/6.7L Cummins Diesel and Automated Safety Hitch
2016 377RLBH Jayco North Point
300W of Suntech Solar w/Rogue MPPT Controller & Xantrex 2000W PSW Inverter
|
|
|
|
|
06-07-2016, 05:43 AM
|
#295
|
|
Senior Member
Join Date: Jan 2016
Location: Magnolia
Posts: 4,841
|
That is a great first post! Well done.
Are you going to leave the vent cover white or will you paint it black?
Sent from my iPhone using Tapatalk
__________________
2016 North Point 377 RLBH, with a few mods, disc brakes, shocks, Sailun g rated tires, wet bolts
2014 Ford F350 Platinum sold
2017 Ford F350 Lariat, CC, 6.7PSD, DRW, Trailer Saver BD3 hitch
|
|
|
|
|
06-07-2016, 04:03 PM
|
#296
|
|
Senior Member
Join Date: May 2016
Location: Way down here........FL
Posts: 2,097
|
Great job!!
I'm also in the process of installing mine.
You should be able to tighten drain trap if yours is like mine.
Jack
|
|
|
|
|
06-08-2016, 09:18 PM
|
#297
|
|
Junior Member
Join Date: Jun 2016
Location: El Paso
Posts: 4
|
Quote:
Originally Posted by Magnolia Tom
That is a great first post! Well done.
Are you going to leave the vent cover white or will you paint it black?
Sent from my iPhone using Tapatalk
|
I am still debating, I don't know if my painting skills are good enough to not detract from the great paint scheme already. Thanks for the compliments guys! I will go make it a new thread so people can search it easier!
|
|
|
|
|
06-09-2016, 06:19 AM
|
#298
|
|
Senior Member
Join Date: Jan 2016
Location: Magnolia
Posts: 4,841
|
On my previous rig, I installed the vent just like you did and I painted it with a can of krylon spray paint for plastic. Very easy. Use 3 light coats and done.
Sent from my iPhone using Tapatalk
__________________
2016 North Point 377 RLBH, with a few mods, disc brakes, shocks, Sailun g rated tires, wet bolts
2014 Ford F350 Platinum sold
2017 Ford F350 Lariat, CC, 6.7PSD, DRW, Trailer Saver BD3 hitch
|
|
|
|
|
06-09-2016, 02:59 PM
|
#299
|
|
Member
Join Date: Mar 2016
Location: Key West
Posts: 41
|
I'm down 4 holes in the loft near and around the television bracket location. And have yet to find anything behind that wall to fix a tv bracket to. I saw mocamper did it in post 133. Anyone else?
|
|
|
|
|
06-09-2016, 03:11 PM
|
#300
|
|
Senior Member
Join Date: Aug 2015
Location: York
Posts: 134
|
Can be done but my camper is not nearby at moment or I would take some measurements. If memory serves me right it is to the left of outlet and cable hook up. I did this several months ago and thought I had a sticker that indicated the location.
|
|
|
|
|
|
 Posting Rules
|
You may not post new threads
You may not post replies
You may not post attachments
You may not edit your posts
HTML code is Off
|
|
|
|
 » Recent Threads
 |
|
|
|
|
|
|
|
|
|
|
|
|
|
|
|
|
|
|
|
|
|
|
|
|
|
|
|
|
|
|
|
|
|
|
|
|
|
|
|
|
|


 Linear Mode

