 |
|
 06-16-2018, 09:47 AM
|
#121
|
|
Senior Member
Join Date: Sep 2013
Posts: 193
|
Quote:
Originally Posted by Rustic Eagle

Bill,
The inside of the slide is 3ft deep by 7ft long.
Bob
|
Thank you
|

|

|
|
06-16-2018, 10:02 AM
|
#122
|
|
Junior Member
Join Date: Apr 2018
Location: Fort Worth
Posts: 5
|
Replacing Jack-knife Sofa with Recliners
There was a solution. Apologize for the pictures - first time documenting a project. 2018 Jayflight 24RBS.
Removed the 4 bolts holding sofa to wood frame. Remove sofa.
Disassemble the wood frame, remove false front under sofa, and side wall (end of sofa). The furnace box is left.
Made two frames to mimic the support frame for the sofa to rest on the furnace. Bolted one to the floor next to the furnace box and the other support frame at the far end of where the sofa was.
Cut a sheet of 3/8" plywood to fit the width and depth of the new frame. Screwed the plywood into the support frames. (Ended up removing the plywood, covering it with faux brown leather, then reinstalling).
Modified the false front from the sofa (brown vinyl with two fake legs) to fit back on the new frame. Just took this board and legs apart, trimmed to fit the dimensions, the screwed it into the front of the new frame supports.
Lightweight recliners purchased at Tuesday Morning. They come apart easily to load into the rig. Built a frame for the front of each chair, and a board for the back of each chair. These pieces are screwed into the wooden frame of the bottom of the recliner. Because the chairs are sitting on top of the new platform, I needed to provide a way to recline. The front board is tall - resting on the floor of the rig, the back is much shorter resting on the platform. The chair sits level.
The frames attached to the bottom of each chair (painted dark brown to match the existing cabinet covers) have casters (two per board/4 per chair). By adding the casters, I can roll the chair forward on the platform/trailer floor, to provide room to fully recline. When not reclined, the back of the chairs is in the same position the back of the sofa used to be.
Before reinstalling the side wall (end of sofa nearest the door), using a jigsaw, I cut a hole in the piece to be able to access the open storage space now under the chairs. Using another piece of wood, we made a door covered in the same faux brown leather, added a handle from a dresser, then put a magnet on the side wall and the door for easy access and a finished look.
I hope the description and the pictures make some sense  The picture showing the front of the chair is where the support frame and casters were added.
|
|
|
|
|
06-16-2018, 11:12 AM
|
#123
|
|
Moderator Emeritus
Join Date: Apr 2011
Location: Michigan
Posts: 9,424
|
Jeff (2Adventure),
Nice fore-thought on the twin recliner installation with minimal space utilization..., and keeping the original storage space.
The 24RBS is a floor plan that invites and can accommodate many creative upgrades.
Bob 
__________________

2016 GM 2500HD 6.0L/4.10
2018 Jay Flight 24RBS
2002 GM 2500HD 6.0L/4:10 (retired)
2005 Jayco Eagle 278FBS (retired)
1999 Jayco Eagle 246FB (retired)
Reese HP Dual Cam (Strait-Line)
|
|
|
|
|
06-22-2018, 04:05 PM
|
#124
|
|
Moderator Emeritus
Join Date: Apr 2011
Location: Michigan
Posts: 9,424
|
Added a pair of 'stink deflectors' at the campsite while boondocking
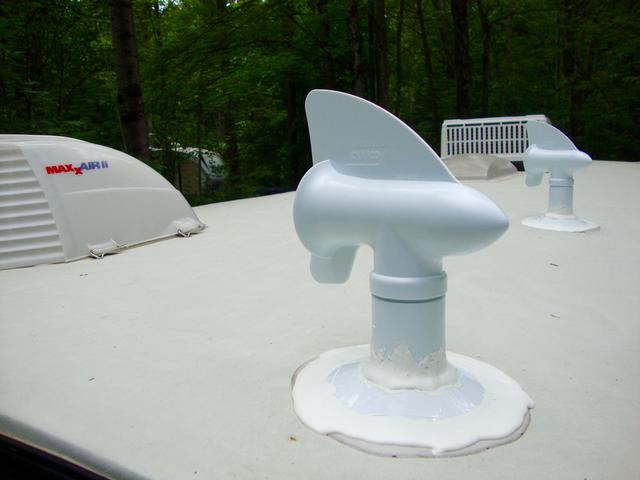
Bob
__________________
2016 GM 2500HD 6.0L/4.10
2018 Jay Flight 24RBS
2002 GM 2500HD 6.0L/4:10 (retired)
2005 Jayco Eagle 278FBS (retired)
1999 Jayco Eagle 246FB (retired)
Reese HP Dual Cam (Strait-Line)
|
|
|
|
|
07-05-2018, 10:27 PM
|
#125
|
|
Moderator Emeritus
Join Date: Apr 2011
Location: Michigan
Posts: 9,424
|
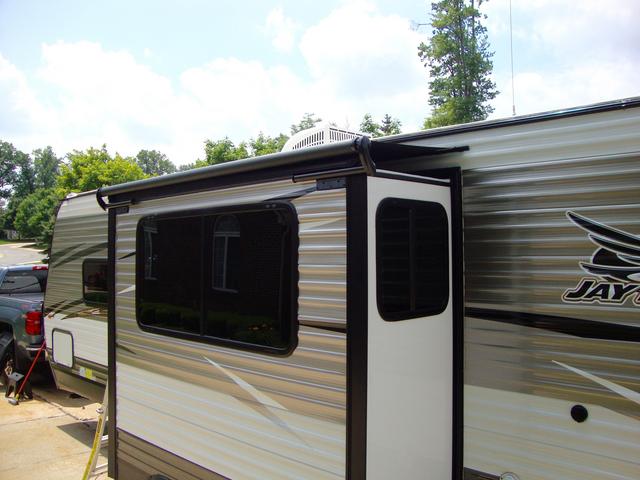
Been tossing the idea of installing a slide topper since I purchased the TT last fall, finally pulled the trigger.
Spending 4-5 months a year in Texas I've found that the interior slide ceiling area heats up pretty fast ..., plus the topper would provide a little more protection of the slide wiper seal area. Dometic with black fabric and hardware.
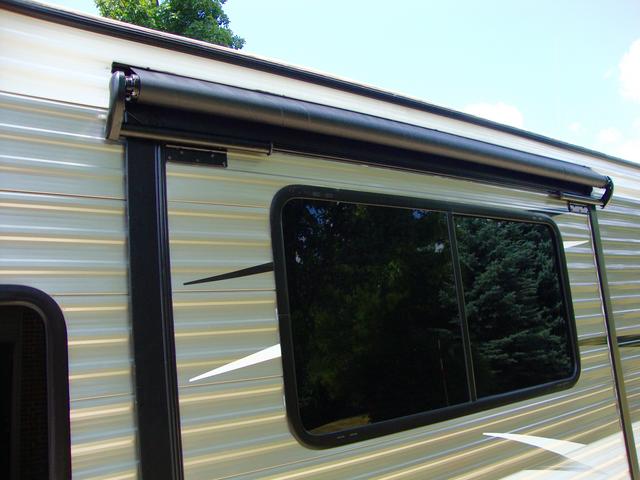
Bob
__________________
2016 GM 2500HD 6.0L/4.10
2018 Jay Flight 24RBS
2002 GM 2500HD 6.0L/4:10 (retired)
2005 Jayco Eagle 278FBS (retired)
1999 Jayco Eagle 246FB (retired)
Reese HP Dual Cam (Strait-Line)
|
|
|
|
|
07-06-2018, 10:41 PM
|
#126
|
|
Senior Member
Join Date: Oct 2016
Location: Austin
Posts: 141
|
Been kicking around a topper myself. Thanks for info
|
|
|
|
|
07-12-2018, 04:59 AM
|
#127
|
|
Senior Member
Join Date: May 2016
Location: N.E. Ohio
Posts: 160
|
I have a few question for you. Does the attachment point of the fabric to the trailer replace the factory gutter? Also, where the awning attaches to the slide, is that area pretty stout? Thanks in advance, it looks great.
__________________
2014 F150 SC/4X4/5.0/3.55/Equal-i-zer 12K/Ride Rite Air Bags
2017 Jay Flight 24RBS Fiberglass, 15K BTU A/C, Thermal package, Alloy wheels
Goodyear Endurance Tires, Morryde CRE-3000 w/Wet Bolt Kit and X-Factor Brace.
(ordered 5/9/16, arrived 10/17/16, brought home 4/14/17)
2005 Trail Cruiser TL-26QBH (sold)
1984 Coachmen PUP (sold)
|
|
|
|
|
07-12-2018, 09:49 AM
|
#128
|
|
Moderator Emeritus
Join Date: Apr 2011
Location: Michigan
Posts: 9,424
|
NismoGriff,
The Jay Flight 24RBS existing gutter rail didn't have accommodations for fabric attachment...., plus the gutter was located to high based on Dometic installation requirements. The Dometic slide topper came with the required awning rail mount.
Yes, the two corner mounting brackets are firmly attached to the slide wall, not the outer frame flange.
Note: My dealer mistakingly installed the Dometic 96" slide topper (as shown in my pic) when the 102" model was required based on Dometic's slide topper sizing chart, which was what I originally requested. I noticed the error later the same day of installation. The 102" length is the fabric tube length (cap-to cap), not the fabric length (98").
The dealer will be installing the correct 102" model next week. The 102" model is also required to allow for proper mounting clearances of the Dometic supplied anti-billowing hardware.
My 24RBS slide flange-to-flange width is 93 1/2" which requires the Dometic model #98001FJ.102U Black Fabric 102" Slide Topper and #9800018.401U Black Hardware kit. I will post a pic showing the correct 102" model once it's installed.
The existing Jayco wall mounted black metal rain gutter was removed to accommodate the new Dometic awning fabric rail mount.
Bob
__________________
2016 GM 2500HD 6.0L/4.10
2018 Jay Flight 24RBS
2002 GM 2500HD 6.0L/4:10 (retired)
2005 Jayco Eagle 278FBS (retired)
1999 Jayco Eagle 246FB (retired)
Reese HP Dual Cam (Strait-Line)
|
|
|
|
|
07-15-2018, 10:12 AM
|
#129
|
|
Moderator Emeritus
Join Date: Apr 2011
Location: Michigan
Posts: 9,424
|
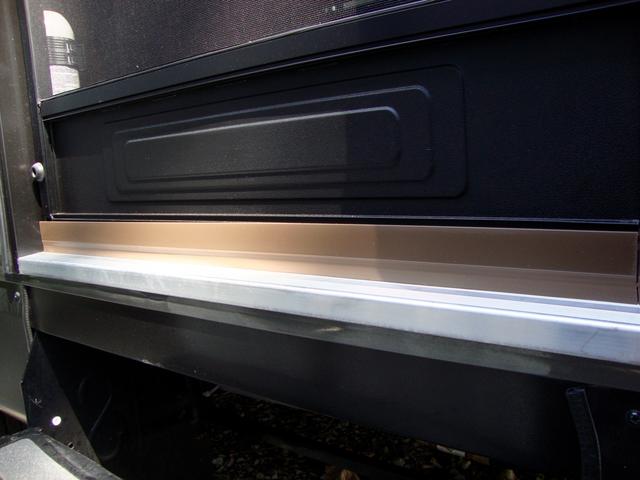
My screen door 'brush' sweep for the most part doesn't even make contact with the door frame sill plate..., and isn't adjustable. The gap is large enough for mice to experience a nice back brushing upon entry.
Found a cheap fix at the local hardware that will keep the little guys out, ants, skeeters, etc.., a basic rubber sweep with a self-adhesive back strip (no drilling). Checked a couple places for a black version, but brown and white seem to be the stocked colors....., I'll replace with black when I run across one.
Original 'gap' condition ....
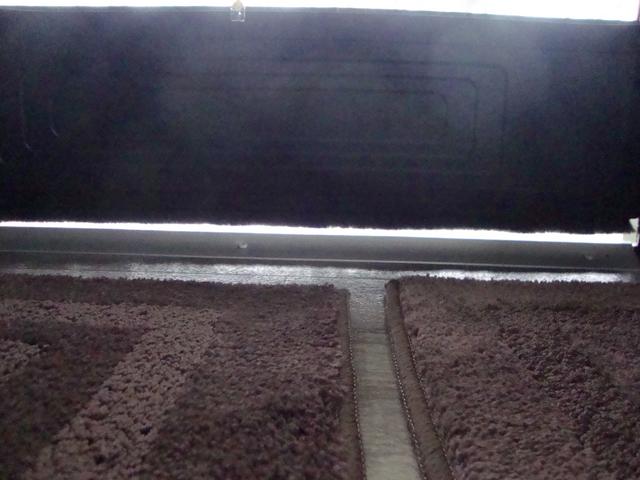
With new rubber sweep installed .....
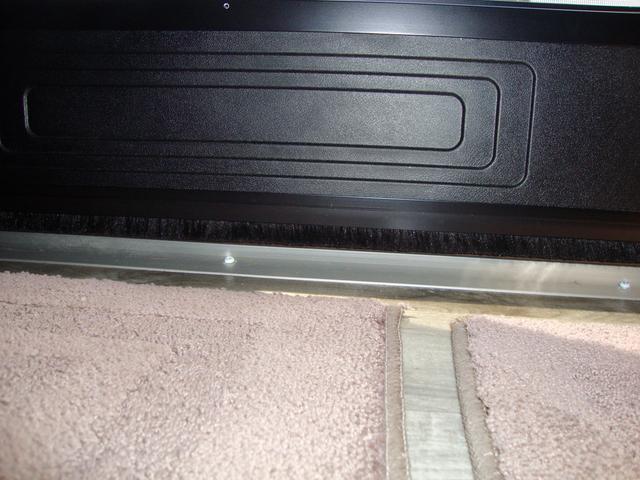
New rubber sweep ....
Bob
__________________
2016 GM 2500HD 6.0L/4.10
2018 Jay Flight 24RBS
2002 GM 2500HD 6.0L/4:10 (retired)
2005 Jayco Eagle 278FBS (retired)
1999 Jayco Eagle 246FB (retired)
Reese HP Dual Cam (Strait-Line)
|
|
|
|
|
07-15-2018, 11:04 AM
|
#130
|
|
Senior Member
Join Date: Mar 2016
Location: Golden
Posts: 213
|
Quote:
Originally Posted by Rustic Eagle
My screen door 'brush' sweep for the most part doesn't even make contact with the door frame sill plate..., and isn't adjustable. The gap is large enough for mice to experience a nice back brushing upon entry.
Found a cheap fix at the local hardware that will keep the little guys out, ants, skeeters, etc.., a basic rubber sweep with a self-adhesive back strip (no drilling). Checked a couple places for a black version, but brown and white seem to be the stocked colors....., I'll replace with black when I run across one.
Original 'gap' condition ....
With new rubber sweep installed .....
New rubber sweep ....
Bob |
Hey Bob,
Do you have a link or stock number off the packaging? Not finding one with an adhesive backing.
Dale
__________________
Dale and Deb
2016 Jay Flight 27BHS TT
2009 Silverado 2500 6.6L Duramax
|
|
|
|
|
07-15-2018, 06:42 PM
|
#131
|
|
Moderator Emeritus
Join Date: Apr 2011
Location: Michigan
Posts: 9,424
|
Dale,
I tossed the packaging but I believe the following link is the same Frost King product I purchased at a local True Value hardware store:
https://www.truevalue.com/36-inch-br...ive-door-sweep
The "Frost King" brand door sweeps seem to be common on hardware shelves.
Bob
__________________
2016 GM 2500HD 6.0L/4.10
2018 Jay Flight 24RBS
2002 GM 2500HD 6.0L/4:10 (retired)
2005 Jayco Eagle 278FBS (retired)
1999 Jayco Eagle 246FB (retired)
Reese HP Dual Cam (Strait-Line)
|
|
|
|
|
07-26-2018, 09:19 AM
|
#132
|
|
Moderator Emeritus
Join Date: Apr 2011
Location: Michigan
Posts: 9,424
|
NismoGriff,
Quote:
Originally Posted by NismoGriff
snip..... Also, where the awning attaches to the slide, is that area pretty stout?......snip
|
Just a word of caution, it's important that the two awning brackets are located properly so "all" 5 screws are attached top the slides outer wood frame.
I've recently found that the 3 lower screws of each bracket missed their mark and are starting to loose their grip. The installer didn't located the brackets snug to the bottom edge of the horizontal flange per Dometic instructions...., short by at least 1". This is a notable installation error.
The dealership is suppose to be getting in contact with Jayco for slide wall build drawings.
Also........., the Dometic installation diagrams all reflect a smooth fiberglas wall, but there isn't any reference to an aluminum wall surface which has an irregular wall surface........., possible screw length issue here as well?? I plan to contact Dometic on this subject.
Bob
__________________
2016 GM 2500HD 6.0L/4.10
2018 Jay Flight 24RBS
2002 GM 2500HD 6.0L/4:10 (retired)
2005 Jayco Eagle 278FBS (retired)
1999 Jayco Eagle 246FB (retired)
Reese HP Dual Cam (Strait-Line)
|
|
|
|
|
07-27-2018, 01:21 PM
|
#133
|
|
Moderator Emeritus
Join Date: Apr 2011
Location: Michigan
Posts: 9,424
|
While waiting on my RV dealership to come up with "their" resolution on my slide topper mounting bracket issue, I moved on to other mods.
I've always heard about some of the issues associated with slide toppers, two being they can hold water and wind flapping noise. In any case, I knew a mod was going to be in-order
The 24RBS slide is 7ft long, and the actual Dometic topper fabric is approx. 98" in length, and my PVC topper fabric support is 100" in length.
Material used:
* 10ft of 1/2" PVC
* 5 PVC Tees
* Package of 4, 1 1/8" Rubber Tips
* Package of 1, 3/4" Rubber Tip
I built the PVC mod support today at my campsite (like many of my mods), and IMO was an easy task. Just a short visit to the local town ACE hardware did the trick for material.
The pics represent pretty much the finished product except for some minor PVC end cut clean-up. I didn't use any PVC adhesive, just went with all sung fit connections...., easy for breakdown and storage in my pass-thru.
The present location of the PVC support under the topper fabric seems to work fine with the rain shower today, but I can still trim the three vertical PVC tubes if moving the support 'outward' is required.
I felt using the rubber tips would aid in keeping the support in place and protecting the slide roof surface. I may purchase a couple more rubber tips for the PVC outer ends.

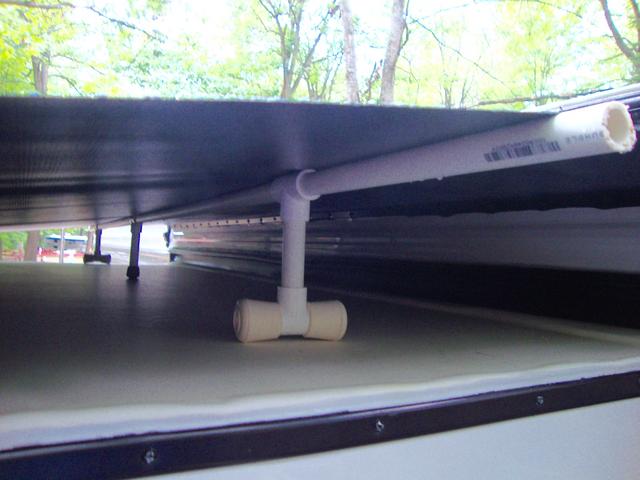
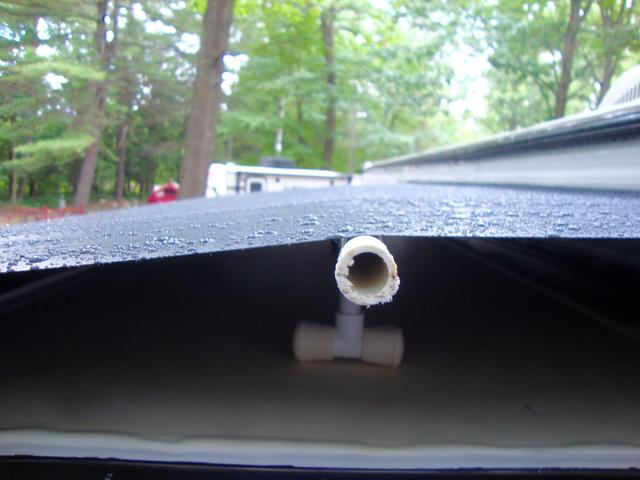
Inserting the support assembly on the slide roof is easy with my travel ladder..., I just slide it along through the larger opening roof/fabric then move it outward into place, snug fit under the fabric. I don't plan to use the PVC support every time I camp, but will use on my extend stay trips and my 4 month winter stay down south.
Bob
__________________
2016 GM 2500HD 6.0L/4.10
2018 Jay Flight 24RBS
2002 GM 2500HD 6.0L/4:10 (retired)
2005 Jayco Eagle 278FBS (retired)
1999 Jayco Eagle 246FB (retired)
Reese HP Dual Cam (Strait-Line)
|
|
|
|
|
07-27-2018, 01:38 PM
|
#134
|
|
Site Team
Join Date: Nov 2010
Location: Virginia`s Eastern Shore
Posts: 17,092
|
Bob, you need to patent that design and start selling!
__________________
2017 Coachmen Catalina 283RKS
2018 Ford F250 Super Duty 6.2l CCSB
2010 Jayflight 28BHS (sold)
|
|
|
|
|
07-27-2018, 02:42 PM
|
#135
|
|
Moderator Emeritus
Join Date: Apr 2011
Location: Michigan
Posts: 9,424
|
Crabman,
I've seen different PVC and other materials used for this type of application.., mine is a combination/tweaking of the different ideas out there.
Bob
__________________
2016 GM 2500HD 6.0L/4.10
2018 Jay Flight 24RBS
2002 GM 2500HD 6.0L/4:10 (retired)
2005 Jayco Eagle 278FBS (retired)
1999 Jayco Eagle 246FB (retired)
Reese HP Dual Cam (Strait-Line)
|
|
|
|
|
07-27-2018, 03:12 PM
|
#136
|
|
Moderator Emeritus
Join Date: Oct 2012
Location: Cape Coral, Florida
Posts: 4,793
|
Looks good Bob. I'll put this one in my notebook for later.
Doug
__________________

Cape Coral, Florida
2021 Toyota Tundra SR5, 5.7 V8
2022 Jayco 240RBS
|
|
|
|
|
07-27-2018, 05:33 PM
|
#137
|
|
Senior Member
Join Date: Jul 2014
Posts: 957
|
I used a child's play ball, bigger than a softball but smaller than a soccer ball that was soft/pliable but could be firmed up with a hand air pump to support the slide topper on our class C.
__________________
'08 Greyhawk 31SS Traded in
2018 MR2410RL
Goodyear Endurance
Equalizer WDH
TV 2018 F150 FX4 SC 3.5EB TP/MT
|
|
|
|
|
09-07-2018, 01:45 PM
|
#138
|
|
Moderator Emeritus
Join Date: Apr 2011
Location: Michigan
Posts: 9,424
|
I've come to the conclusion my 2018 WFCO 8955 PEC Converter/Charger never has functioned at "Bulk Mode" (14.4Vdc) as specified....., not good for an avid boondocker like myself because battery bank charge time was ridiculous when attempting the recharge process. Detailed discussion on this subject matter at following JOF thread:
https://www.jaycoowners.com/forums/f...e-60417-2.html
I found through some on-line research that the WFCO 8955 "Bulk Mode" issue was experienced by other "boondockers" as well.
Removing and replacing the OEM WFCO 8955 with the Progressive Dynamics 4655L MBA Wildkat 55 Amp "Up-grade" Converter/Charger was pretty straight forward..., R&R a few screws and 5 wires....., about 1 hour.
OEM WFCO 8955 Converter/Charger:
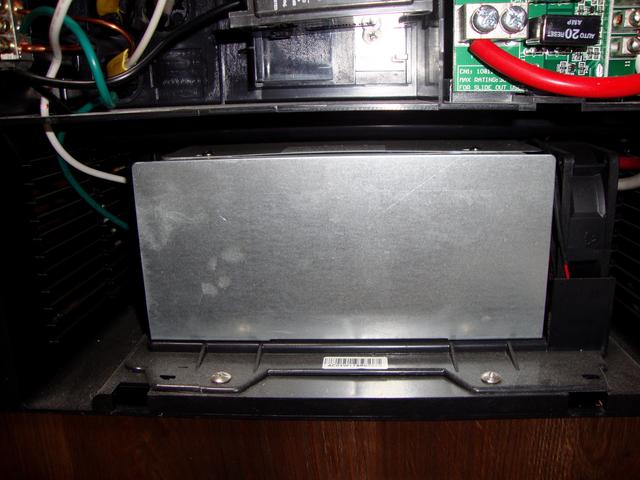
New PD 4655L Converter/Charger:
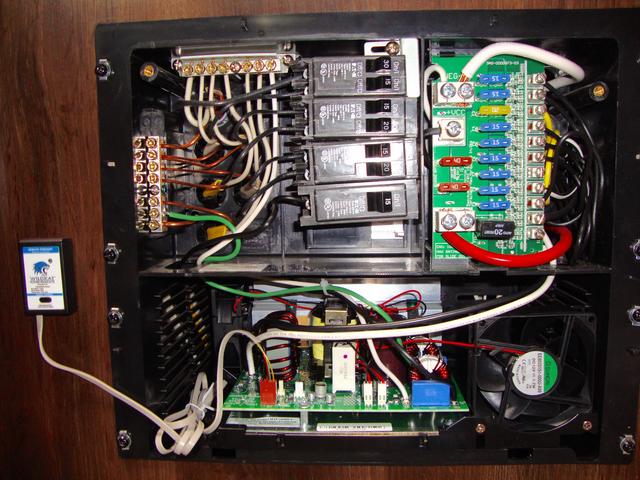
I used a drill bit to notch out a slight opening in the plastic frame for the remote wire pass-thru:
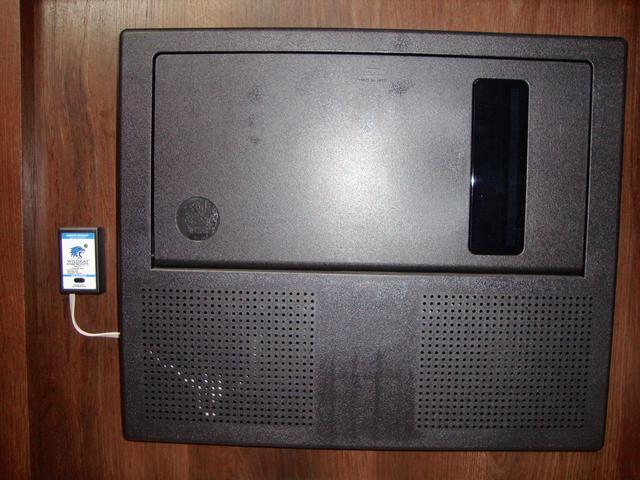
The best charge voltage I could get with the WFCO 8955 was 13.4Vdc - 13.6Vdc....., the PD 4655L provided me with 14.1Vdc - 14.2Vdc on a pre-charged (100%) single 12V battery (initiated at remote).
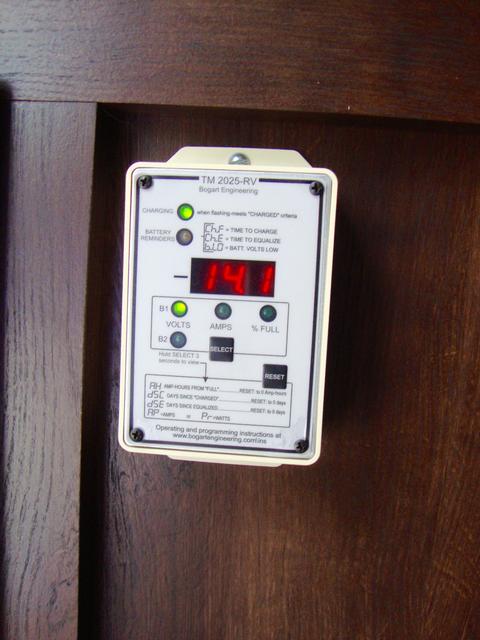
PD 4655L Converter/Charger source:
PD 4655L MBA WildKat 55 Amp Main Board Assembly for WFCO 8955 or Parallax 7155 (Includes 4600 Remote)
Happy Camper 
Bob
__________________
2016 GM 2500HD 6.0L/4.10
2018 Jay Flight 24RBS
2002 GM 2500HD 6.0L/4:10 (retired)
2005 Jayco Eagle 278FBS (retired)
1999 Jayco Eagle 246FB (retired)
Reese HP Dual Cam (Strait-Line)
|
|
|
|
|
02-10-2019, 04:23 AM
|
#139
|
|
Junior Member
Join Date: Jan 2019
Location: NE Georgia mountains
Posts: 19
|
Splitting the step light and awning light circuit?
I'm considering splitting the shared switched circuit that lights both the stairs light and awning light.
Have you done this? Any pics or advice?
|
|
|
|
|
|
 Posting Rules
|
You may not post new threads
You may not post replies
You may not post attachments
You may not edit your posts
HTML code is Off
|
|
|
|
 » Recent Threads
 |
|
|
|
|
|
|
|
|
|
|
|
|
|
|
|
|
|
|
|
|
|
|
|
|
|
|
|
|
|
|
|
|
|
|
|
|
|
|
|
|
|


 Linear Mode

