 |
|
 10-13-2017, 05:49 PM
|
#41
|
|
Senior Member
Join Date: Oct 2016
Location: Jonesboro
Posts: 130
|
Quality issue
So I'm out in my 2018 24RBS the other day and opened the door under the dining seat storage and put a little too much weight on the open door and the frame popped out. I was surprised to see everything in the frame was screwed except the front finished frame. It was stapled. Really Jayco???
No problem. I immediately put wood screws into the frame.
No big deal but would a couple of extra screws have been so hard to I stalled instead of staples???
|

|

|
|
10-13-2017, 06:01 PM
|
#42
|
|
Senior Member
Join Date: Oct 2016
Location: Jonesboro
Posts: 130
|
Manual crank for slide out
Can anyone tell me how to manually crank the slide closed in case of motor failure?
|
|
|
|
|
10-13-2017, 09:45 PM
|
#43
|
|
Moderator Emeritus
Join Date: Apr 2011
Location: Michigan
Posts: 9,424
|
Mbranscum,
Yes, the RV industry is big on using staples and screws that miss their mark.
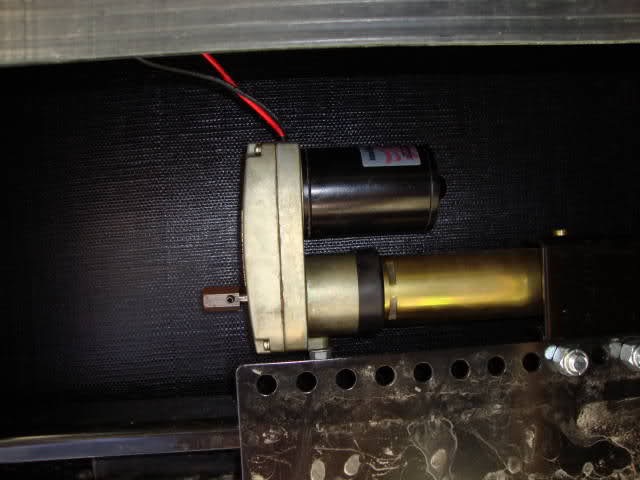
Manual slide operation: I haven't look at my 24RBS slide drive assembly yet, but there is a small (approx. 12" x 12") removable underbody panel that will give access to the slide drive motor area (seen my panel). There will be a hex shaft on the backside of the motor base that a ratchet & socket can be attached allowing for manual slide movement.
NOTE: Refer to the owners manual because there are some additional steps to consider in a manual override condition.
Some slide motors can be excessed thru-the-frame (I-beam) with a OEM supplied rod extension, but didn't get one with my 24RBS (didn't check for an access hole thru the I-beam).
My retired '05' Eagle had a similar slide system.., this is what my Eagle's slide drive looked like with the panel removed:

Bob 
__________________

2016 GM 2500HD 6.0L/4.10
2018 Jay Flight 24RBS
2002 GM 2500HD 6.0L/4:10 (retired)
2005 Jayco Eagle 278FBS (retired)
1999 Jayco Eagle 246FB (retired)
Reese HP Dual Cam (Strait-Line)
|
|
|
|
|
10-16-2017, 09:47 AM
|
#44
|
|
Moderator Emeritus
Join Date: Apr 2011
Location: Michigan
Posts: 9,424
|
Noticed early on there was notable flexing of the two OEM 1 1/4" x 1 1/2" x 6ft wood reinforcements (attached @ plywood bed platform) when raising the bed..., these are the same reinforcements the gas shocks are mounted from. When the bed was fully raised the wood reinforcements were actually "bowed".
Went to Home Depot and picked up (4) 18 gauge 1 1/4" x 36" long metal straps...., centered-mounted/screwed one strap on the opposite side of the gas shock mounting on both wood reinforcements.
My intention will be to install the two remaining straps on the gas shock mounting side of the wood reinforcements, thus sandwiching the wood reinforcement with thru-bolts/nuts. I'll have to drill some holes thru the two remaining metal straps for remounting the gas shock mounts.
I seldom raise the bed.., but, IMO it was obvious that Jayco's existing set-up wasn't designed for longevity.
Pic doesn't show two remaining metal straps installed (gas shock mount side)......
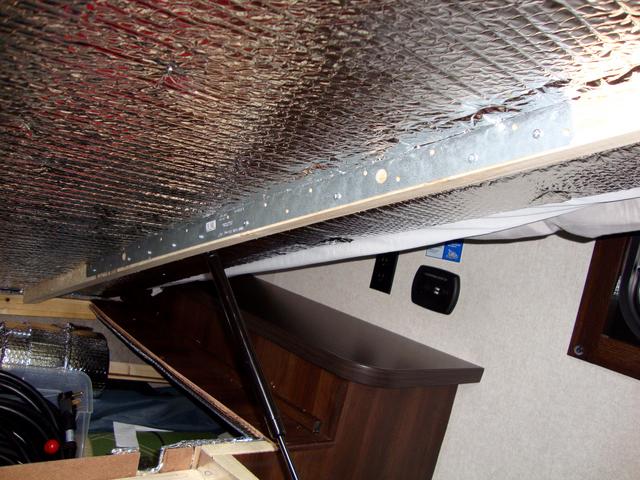
Looking back on this mod installing at least 48" long metal straps would have been a perfect fit for the application.
Bob
__________________
2016 GM 2500HD 6.0L/4.10
2018 Jay Flight 24RBS
2002 GM 2500HD 6.0L/4:10 (retired)
2005 Jayco Eagle 278FBS (retired)
1999 Jayco Eagle 246FB (retired)
Reese HP Dual Cam (Strait-Line)
|
|
|
|
|
10-18-2017, 08:38 AM
|
#45
|
|
Senior Member
Join Date: Jan 2014
Location: Bremerton
Posts: 342
|
Quote:
Originally Posted by Rustic Eagle

I checked off a few other tasks by days end.
....
4. Completed mounting of Reese Dual Cam (thru bolt grade 8 w/backer plate) &
longer HD Safety Chains (gold). The Jayco OEM chains are a little snug for my
TV's OEM receiver style/location...., will have to cut off the Jayco chains later.

Plus some minor stuff....: Moved the Solar Ready connector behind the E-brake switch rather then the other way around......, water pump base had only two screws in a four screw mount so added the missing two....., LP regulator was facing toward the TT so remounted it facing forward.
Bob |
Bob,
how did you mount the Reese dual cam with a backer plate? given that the Jayco tongue is a boxed tube and welded shut at both ends. Wouldn't a backer plate just buckle the tongue?
Tim
|
|
|
|
|
10-18-2017, 09:00 AM
|
#46
|
|
Senior Member
Join Date: Jan 2014
Location: Bremerton
Posts: 342
|
Bob,
I have noticed two additional things about my raised platform queen.
- the struts aren't strong enough to keep the bed raised when there is stuff on the bed. (clothes or additional bedding). I'm looking for more powerful struts.
- As I have a short queen, I push the mattress down and add a rolled up blanket at the head to give a bit more length. I have to figure out how the extend the platform to support the full length of the mattress.
I like your metal strap solution.
Tim.
Quote:
Originally Posted by Rustic Eagle
Noticed early on there was notable flexing of the two OEM 1 1/4" x 1 1/2" x 6ft wood reinforcements (attached @ plywood bed platform) when raising the bed..., these are the same reinforcements the gas shocks are mounted from. When the bed was fully raised the wood reinforcements were actually "bowed".
Went to Home Depot and picked up (4) 18 gauge 1 1/4" x 36" long metal straps...., centered-mounted/screwed one strap on the opposite side of the gas shock mounting on both wood reinforcements.
My intention will be to install the two remaining straps on the gas shock mounting side of the wood reinforcements, thus sandwiching the wood reinforcement with thru-bolts/nuts. I'll have to drill some holes thru the two remaining metal straps for remounting the gas shock mounts.
I seldom raise the bed.., but, IMO it was obvious that Jayco's existing set-up wasn't designed for longevity.
Pic doesn't show two remaining metal straps installed (gas shock mount side)......

Looking back on this mod installing at least 48" long metal straps would have been a perfect fit for the application.
Bob |
|
|
|
|
|
10-18-2017, 11:02 AM
|
#47
|
|
Moderator Emeritus
Join Date: Apr 2011
Location: Michigan
Posts: 9,424
|
Tim,
Quote:
Originally Posted by tjpolsin
snip...... I have to figure out how the extend the platform to support the full length of the mattress.......snip
|
One could replace the existing plywood platform with an appropriately sized longer one..., or add a removable extension piece of plywood (different ways of attaching). What has to be taken into consideration is if the bed will still be "raised" from lifting the end of the bed platform (or sat upon).
My 24RBS came with the full residential size queen bed, but as I mentioned the bed platform design & material (wood) is inadequate. Thus far the OEM struts seem to be doing the job.
Quote:
Originally Posted by tjpolsin
Bob,
how did you mount the Reese dual cam with a backer plate?.....snip
|
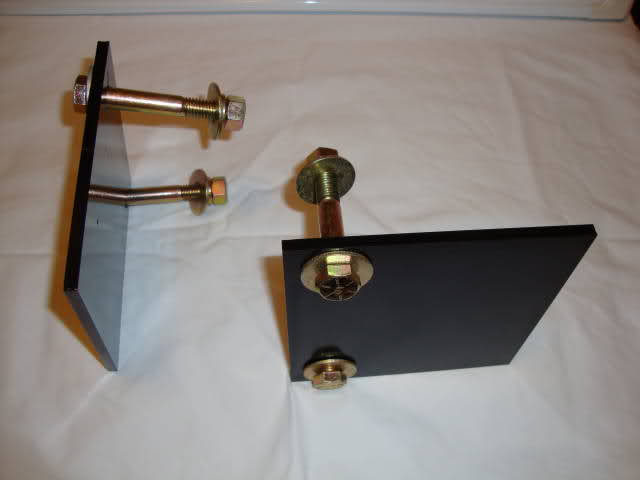
The backer plate is the same height as the A-frame tube (against the steel radius corners, strongest part), thus the backer plate prevents compromising the A-frame tube when tightening the grade 8 bolts. I transferred this set-up from my retired '05' Eagle.
Following is my original JOF thread link on the Reese backer plate MOD, and why I did it:
https://www.jaycoowners.com/forums/f...em-6606-4.html
Bob
__________________
2016 GM 2500HD 6.0L/4.10
2018 Jay Flight 24RBS
2002 GM 2500HD 6.0L/4:10 (retired)
2005 Jayco Eagle 278FBS (retired)
1999 Jayco Eagle 246FB (retired)
Reese HP Dual Cam (Strait-Line)
|
|
|
|
|
10-18-2017, 10:15 PM
|
#48
|
|
Senior Member
Join Date: Jun 2016
Location: Mechanicsville
Posts: 1,479
|
The OEM struts on my 23RB are strong enough to hold up my 10" memory foam mattress with no problem. It takes some effort to put it back down.
I believe they are 100# struts.
Quote:
Originally Posted by tjpolsin
Bob,
I have noticed two additional things about my raised platform queen.
- the struts aren't strong enough to keep the bed raised when there is stuff on the bed. (clothes or additional bedding). I'm looking for more powerful struts.
- As I have a short queen, I push the mattress down and add a rolled up blanket at the head to give a bit more length. I have to figure out how the extend the platform to support the full length of the mattress.
I like your metal strap solution.
Tim.
|
__________________
Erroll and Mary Doss and Duffy (RIP)
2018 Jayco Redhawk 22J
2014 F150 SC, 4x4, HD Pkg, Sterling Gray
|
|
|
|
|
10-22-2017, 03:02 PM
|
#49
|
|
Moderator Emeritus
Join Date: Apr 2011
Location: Michigan
Posts: 9,424
|
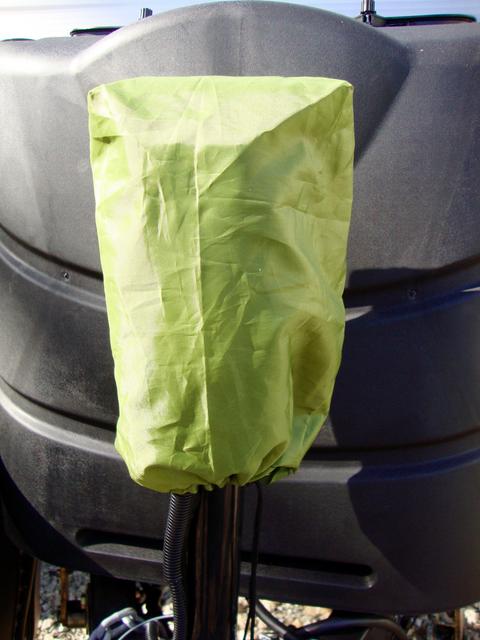
Jayco doesn't run a bead of caulk along the top of the frame style windows any more like they did on my '05' Eagle. The frame style window is installed with a rubber foam style gasket that sets "below" the outer window frame edge, thus creating a water trap behind the window frame. Also, over time foam style gaskets have a tendency to become compromised without one noticing.
I ran a bead of clear silicone caulk along and behind the top frame edge and a couple of inches down the side of all the window frames. On my '05' Eagle after about 5 years I removed all the windows and replaced the cracking/hardened foam seals with Butyl putty tape, a more effective and longer lasting seal.


Also re-installed my larger diameter sewer hose housing mod from my retired '05' Eagle on the 24RBS....
Put a new draw-string ditty bag cover (hiking gear bag) over the jack motor housing..., the one on my '05' Eagle seen to many days. Like my previous cover I can operate the jack without removing the 'ditty'.
Bob
__________________
2016 GM 2500HD 6.0L/4.10
2018 Jay Flight 24RBS
2002 GM 2500HD 6.0L/4:10 (retired)
2005 Jayco Eagle 278FBS (retired)
1999 Jayco Eagle 246FB (retired)
Reese HP Dual Cam (Strait-Line)
|
|
|
|
|
10-25-2017, 06:08 AM
|
#50
|
|
Senior Member
Join Date: Aug 2016
Location: Middle, TN
Posts: 1,098
|
Quote:
Originally Posted by Rustic Eagle
Plan to dig through my plumbing supplies and see what I can come up with for an open/close valve for the HWH tank drain since I drain my tank often. Seen a couple installs by others.
Bob |


|
|
|
|
|
10-25-2017, 07:52 AM
|
#51
|
|
Site Team
Join Date: Nov 2010
Location: Virginia`s Eastern Shore
Posts: 17,092
|
Bob has been busy. I looked at my Windows figuring I may want to also run a bead of caulk over the top, but Coachmen applies it at the factory. One less thing to do but Eternabond may be in the future.
__________________
2017 Coachmen Catalina 283RKS
2018 Ford F250 Super Duty 6.2l CCSB
2010 Jayflight 28BHS (sold)
|
|
|
|
|
10-25-2017, 03:29 PM
|
#52
|
|
Moderator Emeritus
Join Date: Apr 2011
Location: Michigan
Posts: 9,424
|
01tundra,
Basically plan to go with a steel braided hose approach as you did..., just a different valve from my plumbing junk box.
Bob
__________________
2016 GM 2500HD 6.0L/4.10
2018 Jay Flight 24RBS
2002 GM 2500HD 6.0L/4:10 (retired)
2005 Jayco Eagle 278FBS (retired)
1999 Jayco Eagle 246FB (retired)
Reese HP Dual Cam (Strait-Line)
|
|
|
|
|
10-26-2017, 06:54 AM
|
#53
|
|
Member
Join Date: Sep 2015
Location: Athens
Posts: 84
|
Great mods. On my 5th wheel slides I took off the metal trim plate on the bottom of slide sides and cut some plastic sheeting and installed it so it hangs 1 inch below slide as a skirt so water runs down plastic and drips off. This keeps the slide bottom from getting wet and rotting out the slide bottom out. Reinstall metal plate on slide and seal with clear silicone on top of metal trim piece. My slide bottoms have a material mesh product that can absorb water. I am not sure what jayco uses now. Slide floors are a PIA to replace and very expensive if you hire it out. Very nice Jayco you bought.
Sent from my Moto G (5) Plus using Tapatalk
|
|
|
|
|
10-26-2017, 10:20 AM
|
#54
|
|
Moderator Emeritus
Join Date: Apr 2011
Location: Michigan
Posts: 9,424
|
Quote:
Originally Posted by Sk734
snip.......This keeps the slide bottom from getting wet and rotting out the slide bottom out.......snip
|
Sounds like a nice mod...., if you get a chance feel free to start a thread in the "Jayco Mods" forum with a couple pics of your plastic water deflector install. I'm curious what it looks like.
Yes, slide floor repair/replacement can be expensive!
Bob
__________________
2016 GM 2500HD 6.0L/4.10
2018 Jay Flight 24RBS
2002 GM 2500HD 6.0L/4:10 (retired)
2005 Jayco Eagle 278FBS (retired)
1999 Jayco Eagle 246FB (retired)
Reese HP Dual Cam (Strait-Line)
|
|
|
|
|
10-26-2017, 01:44 PM
|
#55
|
|
Member
Join Date: Sep 2015
Location: Athens
Posts: 84
|
Quote:
Originally Posted by Rustic Eagle
Sounds like a nice mod...., if you get a chance feel free to start a thread in the "Jayco Mods" forum with a couple pics of your plastic water deflector install. I'm curious what it looks like.
Yes, slide floor repair/replacement can be expensive!
Bob |
I don't have my Jayco TT anymore. My unit is in storage. Will try to open the slide a little if possible and post some photos of this mod.
Steve
Sent from my Moto G (5) Plus using Tapatalk
|
|
|
|
|
10-26-2017, 02:28 PM
|
#56
|
|
Moderator Emeritus
Join Date: Apr 2011
Location: Michigan
Posts: 9,424
|
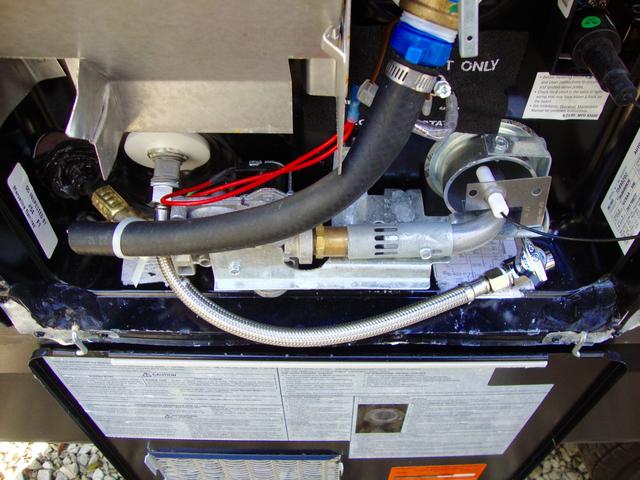
Installed the HWH drain valve today...., same mod as member '01tundra' posted. I already had the valve and plastic threaded fitting, had to purchase the steel braided hose.
Bob
__________________
2016 GM 2500HD 6.0L/4.10
2018 Jay Flight 24RBS
2002 GM 2500HD 6.0L/4:10 (retired)
2005 Jayco Eagle 278FBS (retired)
1999 Jayco Eagle 246FB (retired)
Reese HP Dual Cam (Strait-Line)
|
|
|
|
|
10-27-2017, 10:49 PM
|
#57
|
|
Moderator Emeritus
Join Date: Apr 2011
Location: Michigan
Posts: 9,424
|
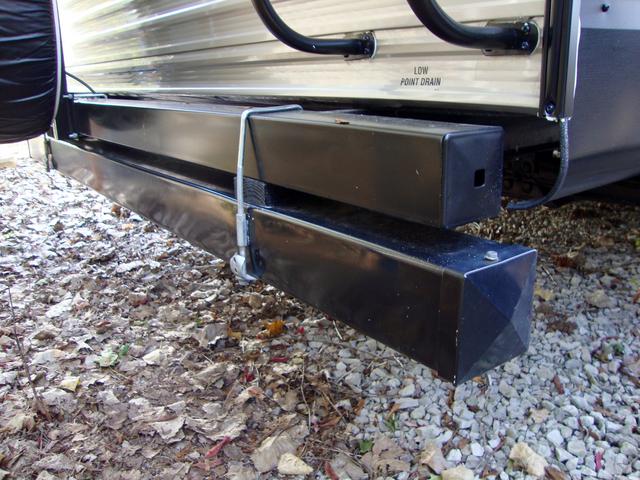
I had a couple folks inquire about the two sets of safety chains on my new 2018 24RBS.
When I purchased my 2016 2500HD TV last year I found that the original OEM safety chains on my retired '05' Eagle were a little snug once attached to my new 2016 TV's receiver, but were just fine on my prior 2500HD's receiver. What I found was that my new 2016 2500HD receiver's safety chain mounting holes were set back a little further then my prior TV's receiver.
My '05' Eagle's OEM safety chains were bolted from underneath the TT's A-frame housing (not welded), on my new 2018 Jayco the safety chains are welded to the A-frame....., but were still a little snug for a tight TV turn.
The two threaded holes under the A-frame were still available on my 2018 Jayco so I just transferred and bolted the longer/higher rated safety chains (gold) from my '05' Eagle to the 24RBS A-frame (attached with two grade 8 bolts). I have yet to remove the original welded OEM safety chains.
I re-installed/bolted the original OEM safety chains (I had saved them) on my '05' Eagle prior to it's retirement.

Bob
__________________
2016 GM 2500HD 6.0L/4.10
2018 Jay Flight 24RBS
2002 GM 2500HD 6.0L/4:10 (retired)
2005 Jayco Eagle 278FBS (retired)
1999 Jayco Eagle 246FB (retired)
Reese HP Dual Cam (Strait-Line)
|
|
|
|
|
10-30-2017, 12:17 PM
|
#58
|
|
Moderator Emeritus
Join Date: Apr 2011
Location: Michigan
Posts: 9,424
|
Quote:
Originally Posted by Rustic Eagle
snip....... I plan to apply EternaBond on the slide roof, just have to decide if I should remove the OEM black sealer tape, tape over it, or hold off for awhile...., will look more closely at the area next week.....snip
|
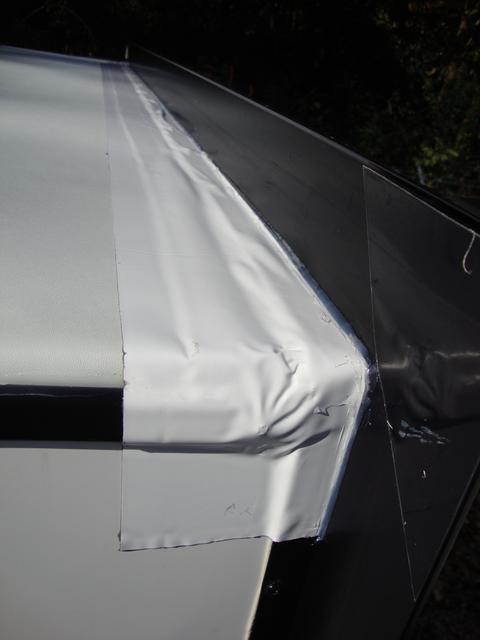
Well "next week" has long passed..., so a couple weeks ago I decided to apply the Eternabond sealer tape over the thin OEM tape that was covering the metal trim/ screw heads along the slide roof.
The following pic was taken a week after applying the Eternabond and I noticed a screw head pushing against the Eternabond tape at the top of the slide's "side wall" trim. I remember before applying the Eteranbond that I had to tighten the same screw......, plan to revisit and investigate further.
 Just a FYI:
 Keep an eye on your OEM black tape on the slide roof, it has a history of peeling off over time exposing the metal trim/screw heads. Also, a bead of clear silicon caulk along the edge of the tape and the outer vertical trim plate will provide an extra seal.
Bob
__________________
2016 GM 2500HD 6.0L/4.10
2018 Jay Flight 24RBS
2002 GM 2500HD 6.0L/4:10 (retired)
2005 Jayco Eagle 278FBS (retired)
1999 Jayco Eagle 246FB (retired)
Reese HP Dual Cam (Strait-Line)
|
|
|
|
|
10-30-2017, 12:58 PM
|
#59
|
|
Senior Member
Join Date: Oct 2016
Location: Jonesboro
Posts: 130
|
Quote:
Originally Posted by Rustic Eagle
Installed the HWH drain valve today...., same mod as member '01tundra' posted. I already had the valve and plastic threaded fitting, had to purchase the steel braided hose.

Bob |
Hey Bob,
Can you give me your parts list for this mod?
Thanks.
Mike
|
|
|
|
|
|
 Posting Rules
|
You may not post new threads
You may not post replies
You may not post attachments
You may not edit your posts
HTML code is Off
|
|
|
|
 » Recent Threads
 |
|
|
|
|
|
|
|
|
|
|
|
|
|
|
|
|
|
|
|
|
|
|
|
|
|
|
|
|
|
|
|
|
|
|
|
|
|
|
|
|
|


 Linear Mode

