 |
|
 12-15-2017, 09:25 AM
|
#81
|
|
Senior Member
Join Date: Dec 2012
Location: Southern Indiana
Posts: 3,209
|
Very nice Bob. I did the same thing with our furnace vent cover which is where my infamous black tank flush vacuum valve is located. Easy access to check for leaks now. Keep 'em coming. 
__________________
2012 Eagle 320 RLDS
2017 Ford F-250 FX4 Crew STX 6.2l
3.73 E-locker
|

|

|
|
12-15-2017, 10:25 AM
|
#82
|
|
Moderator Emeritus
Join Date: Oct 2012
Location: Cape Coral, Florida
Posts: 4,796
|
We did the same mod to the access panel to the HW bypass valves. For a quick fix, I ground screw off, put a little glue on it and ran it back in. Wife approved lol
__________________

Cape Coral, Florida
2021 Toyota Tundra SR5, 5.7 V8
2022 Jayco 240RBS
|
|
|
|
|
12-20-2017, 06:43 PM
|
#83
|
|
Moderator Emeritus
Join Date: Apr 2011
Location: Michigan
Posts: 9,424
|
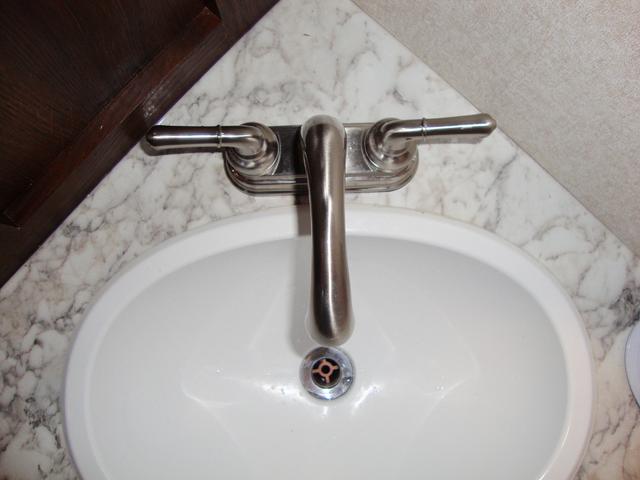
The bathroom sink faucet my be fine for children, but getting a pair of adult hands under it without hitting the back of the sink just wasn't happening. Removed the original and installed a new faucet that is now adult friendly
Original.......
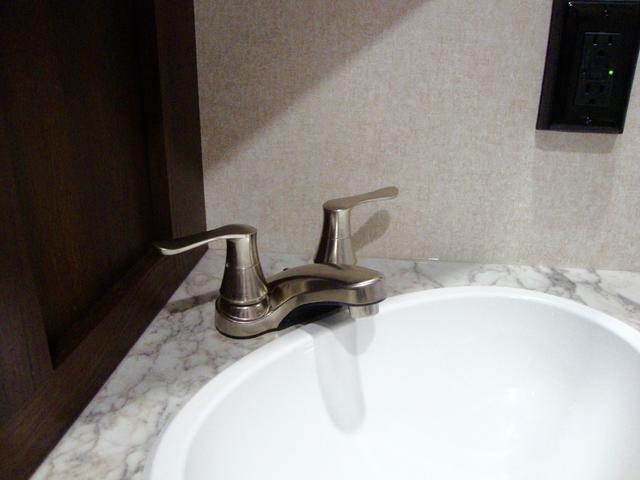
New........
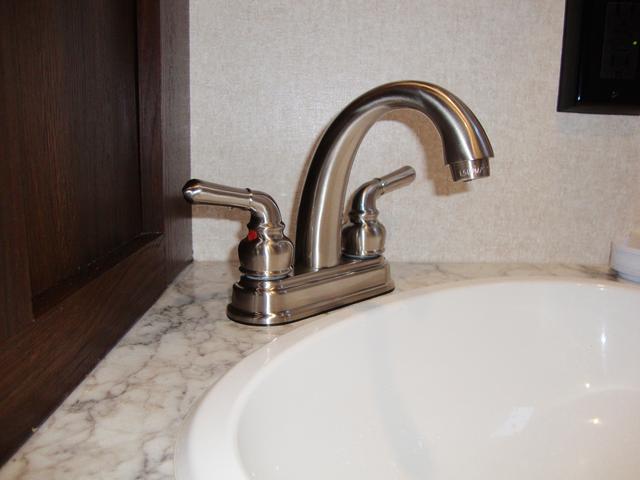
New Faucet: https://www.etrailer.com/RV-Bathroom...77-000087.html
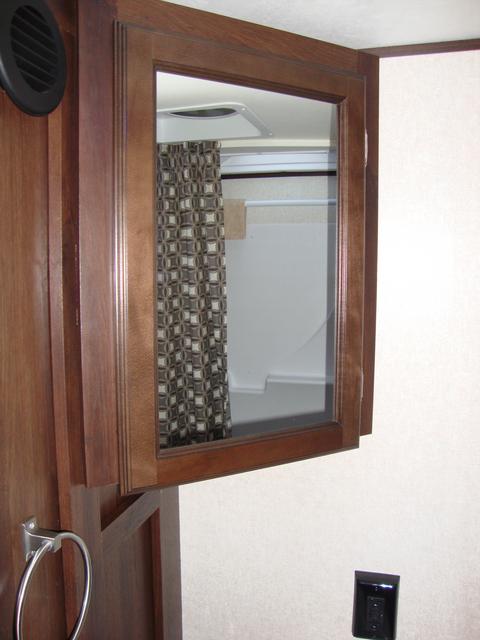
The medicine cabinet location over the sink didn't leave a lot of room between the sink and the bottom of the cabinet, so I raised the cabinet approx. 6". Also, being 6'-4" the new location made the area a little more user friendly.
Bob
__________________

2016 GM 2500HD 6.0L/4.10
2018 Jay Flight 24RBS
2002 GM 2500HD 6.0L/4:10 (retired)
2005 Jayco Eagle 278FBS (retired)
1999 Jayco Eagle 246FB (retired)
Reese HP Dual Cam (Strait-Line)
|
|
|
|
|
12-28-2017, 08:09 PM
|
#84
|
|
Junior Member
Join Date: Dec 2017
Location: Saint Augustine
Posts: 11
|
2018 Jayco 24RBS Bathroom Faucet replacement
Replaced the cheap bathroom faucet with a Glacier Bay from Home Depot today. Pretty straight forward. Had to use clear silicone on the pop up drain rod since its not used. Thanks Bob for the inspiration...Wife says if Bob can do it so can you..lol
|
|
|
|
|
12-28-2017, 08:19 PM
|
#85
|
|
Junior Member
Join Date: Dec 2017
Location: Saint Augustine
Posts: 11
|
medicine cabinet
Bob,
I moved the door up on the medicine cabinet and added a door pull. Left original hinge mount locations on front of the cabinet as to avoid patching holes on the face. I think it turned out really well. Was not a fan of the door being off center just so you could open it. Jayco should rethink the way they do those. Found the door pull at home depot. It's the same shape but finish is slightly different..not very noticeable. Picture shows 1 screw in the hinge but there are 3 in each. I also used wood putty to fill the old holes and then used a touch up marker to fill in the color of the old holes.
|
|
|
|
|
12-28-2017, 09:05 PM
|
#86
|
|
Moderator Emeritus
Join Date: Apr 2011
Location: Michigan
Posts: 9,424
|
Jomede,
Welcome to JOF 
Nice up-grade on your bath faucet...., IMO much more user friendly.
I often wondered why Jayco didn't put handles on some of their medicine cabinet doors in lieu of the off-set....... 
Also, the wash cloth ring I seldom use...., all I can see is the wood finish taking a hit due to a damp cloth resting/dripping against it over time. Considering remounting the ring under the medicine cabinet (since my cabinet is raised), or mounting a different fixture elsewhere.
Bob
__________________
2016 GM 2500HD 6.0L/4.10
2018 Jay Flight 24RBS
2002 GM 2500HD 6.0L/4:10 (retired)
2005 Jayco Eagle 278FBS (retired)
1999 Jayco Eagle 246FB (retired)
Reese HP Dual Cam (Strait-Line)
|
|
|
|
|
12-28-2017, 09:43 PM
|
#87
|
|
Moderator Emeritus
Join Date: Apr 2011
Location: Michigan
Posts: 9,424
|
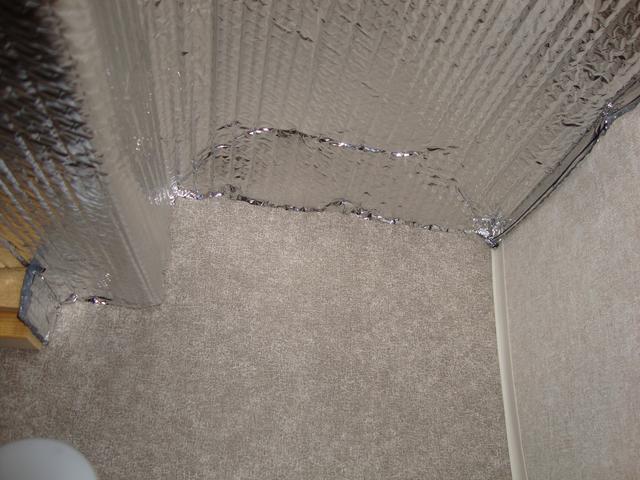
Just an up-date......, the bubble foil insulation that I installed (post #26) in the cargo pass-thru works great!
We've been having some cold/windy nights here in Texas this winter and I haven't experienced any cold drafts coming up around the front bed mattress area.
Bob
__________________
2016 GM 2500HD 6.0L/4.10
2018 Jay Flight 24RBS
2002 GM 2500HD 6.0L/4:10 (retired)
2005 Jayco Eagle 278FBS (retired)
1999 Jayco Eagle 246FB (retired)
Reese HP Dual Cam (Strait-Line)
|
|
|
|
|
01-03-2018, 08:53 PM
|
#88
|
|
Moderator Emeritus
Join Date: Apr 2011
Location: Michigan
Posts: 9,424
|
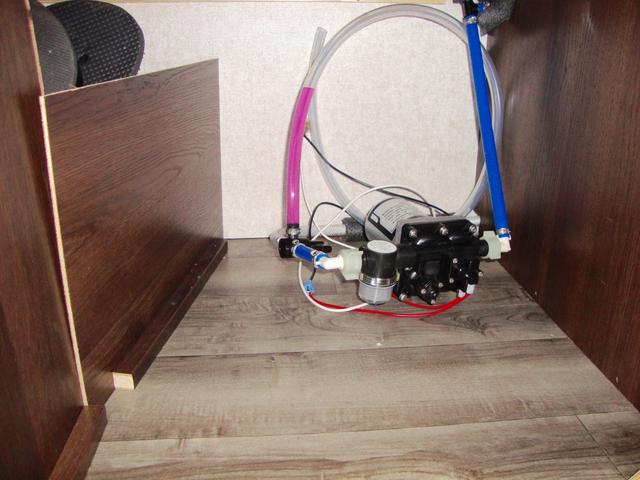
I've been getting frequent erratic pulsating/spikes with my water pump, especially with minimal and/or full water flow at the faucets, toilet/shower were fine. If it wasn't for the fact that I do a lot of boondocking I'd leave well enough alone...., but decided to install a SHURFLO 24oz. accumulator tank.
Fortunately there was enough open space around the water pump to mount the accumulator tank. I did move the pump slightly, and added a wood cross board for secure mounting of the tank. For effective winterizing/sanitizing SHURFLO recommends the valve stem facing "up".
I decided not to attach the tank directly to the pump outlet port in favor of a little space between the two products for easier servicing. I didn't alter the existing connector/PEX line from the pump outlet in the event I had to reconnect it at later date (tank issue, etc.).
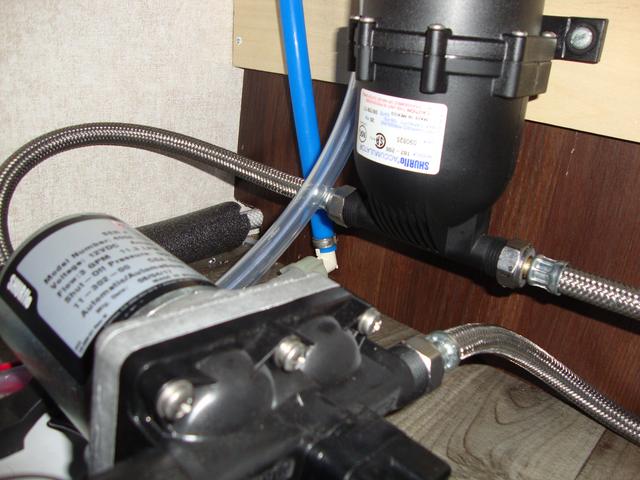
A couple 20" long steel braided hoses and a threaded adaptor was all that was needed to make my water line connections. I added a vibration pad under the pump as well.
In my case the addition of the accumulator tank eliminated all the erratic pulsating at the pump and quieted the pump operation as well. IMO worth the investment.

SHURFLO Accumulator: Pre-Pressurized Accumulator Tank 24 oz. Nylon Accumulator | RV Products
Bob
__________________
2016 GM 2500HD 6.0L/4.10
2018 Jay Flight 24RBS
2002 GM 2500HD 6.0L/4:10 (retired)
2005 Jayco Eagle 278FBS (retired)
1999 Jayco Eagle 246FB (retired)
Reese HP Dual Cam (Strait-Line)
|
|
|
|
|
01-07-2018, 11:25 PM
|
#89
|
|
Moderator Emeritus
Join Date: Apr 2011
Location: Michigan
Posts: 9,424
|
With outside temps below freezing and the TT furnace maintaining a 68 degree inside temp, the outside kitchen area that I converted into a storage area basically followed the outside temps. Wintering in Texas this year we have been experiencing freezing temps on a regular basis and brought the issue to light.
Since the water lines remain in the area along with fluids I now store there, I decided to direct a little heat into the area. There was already an access panel in the bathroom to the area, so I mounted a vent on the panel to allow some heat to creep into the converted storage area.
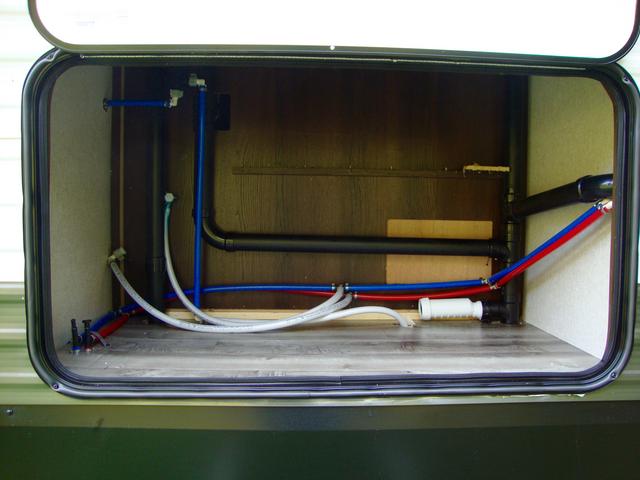
As you can see, the prior kitchen area still houses plenty of functioning water lines. The existing bathroom access panel is located on the back wall, lower right......
Air vent installed on existing access panel. The bathroom heating floor vent is located directly across (a plus) from the new panel vent ..........

Now the water lines and liquid cargo are protected from outside freezing temps ....
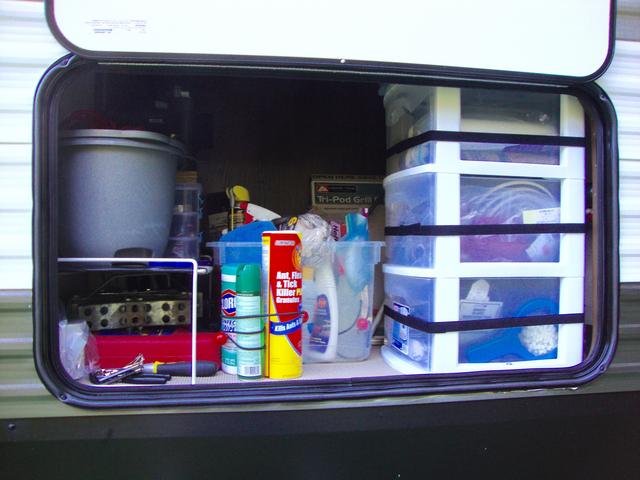
Checked the storage area thermometer with outside temps below freezing and the storage area stayed above 45 degrees.
If I want to close off the vent I'll just put a magnetic cover over it.
Bob
__________________
2016 GM 2500HD 6.0L/4.10
2018 Jay Flight 24RBS
2002 GM 2500HD 6.0L/4:10 (retired)
2005 Jayco Eagle 278FBS (retired)
1999 Jayco Eagle 246FB (retired)
Reese HP Dual Cam (Strait-Line)
|
|
|
|
|
01-12-2018, 02:40 PM
|
#90
|
|
Senior Member
Join Date: Oct 2014
Location: Salem
Posts: 820
|
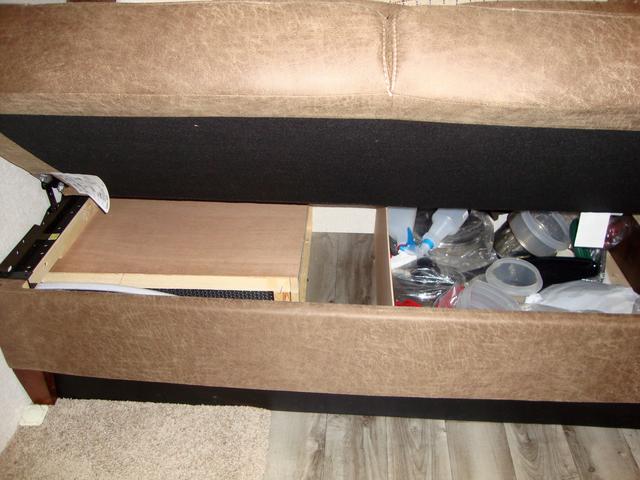
Just curious, whats under the sofa? Could it be removed and replaced with a small type theater wall hugger sofa?
|
|
|
|
|
01-12-2018, 03:44 PM
|
#91
|
|
Member
Join Date: Jan 2014
Location: Pittsburgh
Posts: 38
|
Quote:
Originally Posted by goducks

Just curious, whats under the sofa? Could it be removed and replaced with a small type theater wall hugger sofa?
|
We are getting ready to order our new 24rbs and was wondering the same thing. We have a 2015 23rb and assume that it is the same furnace layout but wanted to know for sure.
__________________
Vince & Paula
2015 23RB
2009 Chevy Tahoe

|
|
|
|
|
01-12-2018, 04:00 PM
|
#92
|
|
Senior Member
Join Date: Oct 2014
Location: Salem
Posts: 820
|
just watched a video of one. Yep the furnace is under there. The furnace exhaust was on the outside right where the sofa is located.
|
|
|
|
|
01-12-2018, 06:35 PM
|
#93
|
|
Moderator Emeritus
Join Date: Apr 2011
Location: Michigan
Posts: 9,424
|
VinceN & goducks.....,
Your correct, the furnace is under the sofa. There is room to the right of the furnace for a single wall hugger recliner...., it's 3'-4" from edge of the wood furnace enclosure to the far right end of the existing sofa. The wood furnace enclosure is approx. 24" x 24" x 10" tall. The fresh water tank fill and water line is directly in front of the enclosure.
The Lazy-boy wall hugger I have is 32" wide and requires approx. 3'-4" deep footprint when in the upright position. I wouldn't consider a wall hugger recliner any bigger then this.
Adding a recliner to the right of the furnace would reduce the walk-thru space a little between the recliner and corner kitchen counter...., and with the recliner extended the leg/foot support would be over the floor furnace vent.
I've considered adding a 2nd recliner in lieu of the sofa, but for now having the extra storage space is nice.
Reference my 2018 24RBS:
Bob
__________________
2016 GM 2500HD 6.0L/4.10
2018 Jay Flight 24RBS
2002 GM 2500HD 6.0L/4:10 (retired)
2005 Jayco Eagle 278FBS (retired)
1999 Jayco Eagle 246FB (retired)
Reese HP Dual Cam (Strait-Line)
|
|
|
|
|
01-25-2018, 12:48 PM
|
#94
|
|
Member
Join Date: Jun 2017
Location: Richmond
Posts: 35
|
Question- was your furnace located under your jack knife sofa? My furnace is located under my sofa with the exhaust vent coming out the front left of center of the sofa. I would like to install two recliners in place of the sofa but don't know how to get around the furnace problem. Any ideas from anyone?
|
|
|
|
|
02-14-2018, 12:41 PM
|
#95
|
|
Moderator Emeritus
Join Date: Apr 2011
Location: Michigan
Posts: 9,424
|
Finally tackled re-routing the large wire bundle that 'originally' went over the top of the metal angle battery box supports. The 'over the top' wire bundle would interfere with the installation of my two 6V deep cycle battery boxes that I had in my retired Eagle.
Was a straight forward task that involved removing/remounting/disconnecting/re-routing the associated wired items then attaching the wire bundle from 'beneath' the metal angle battery box supports (like it was on my Eagle).
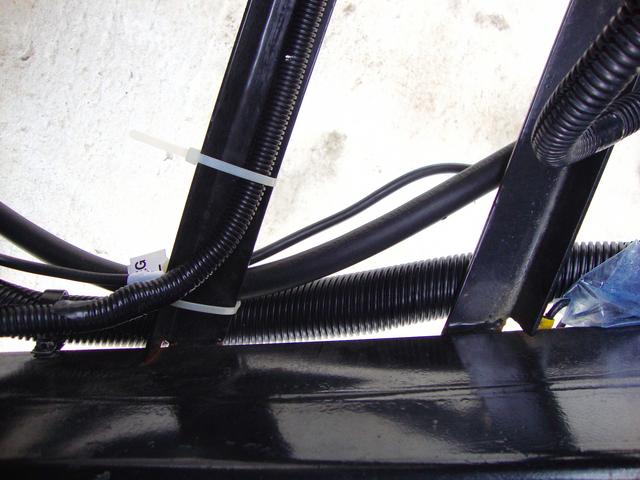
Will install the two 6V batteries this spring.
Bob
__________________
2016 GM 2500HD 6.0L/4.10
2018 Jay Flight 24RBS
2002 GM 2500HD 6.0L/4:10 (retired)
2005 Jayco Eagle 278FBS (retired)
1999 Jayco Eagle 246FB (retired)
Reese HP Dual Cam (Strait-Line)
|
|
|
|
|
02-20-2018, 07:49 AM
|
#96
|
|
Moderator Emeritus
Join Date: Apr 2011
Location: Michigan
Posts: 9,424
|
Finally removed the two water lines to the outdoor sink/stove drawer I removed a few months ago, using a couple SharkBite connectors in lieu of the original 'T' connectors.
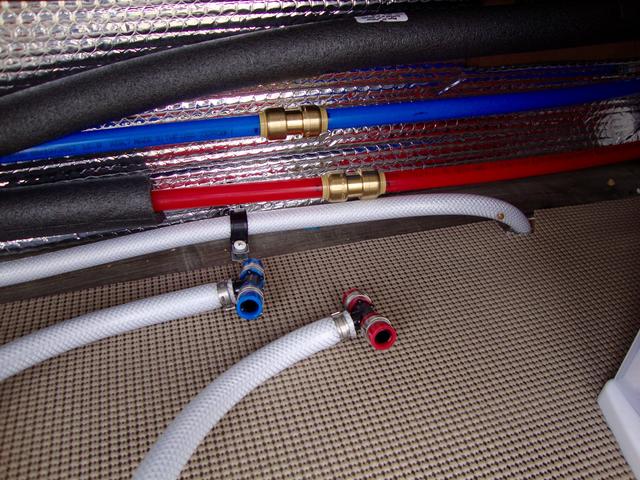
Bob
__________________
2016 GM 2500HD 6.0L/4.10
2018 Jay Flight 24RBS
2002 GM 2500HD 6.0L/4:10 (retired)
2005 Jayco Eagle 278FBS (retired)
1999 Jayco Eagle 246FB (retired)
Reese HP Dual Cam (Strait-Line)
|
|
|
|
|
02-23-2018, 04:43 PM
|
#97
|
|
Moderator Emeritus
Join Date: Apr 2011
Location: Michigan
Posts: 9,424
|
Tackled installing the three Lexan panels into my screen door today, and overall the install went without any issues. The screens remain, the panels were installed on the 'interior' side of the screen door. I purchased the standard clear 1/8" Lexan, not the higher UV grade material.
I cut the Lexan widths so both sides would insert into the screen door's existing vertical tracks. I bowed the Lexan panel slightly in-order to get both panel side edges to seat into the door's vertical track(s). The top/bottom edges of the Lexan panels were cut to be flush (resting on bottom door frame surface opening) with their respective top/bottom door frame surface.
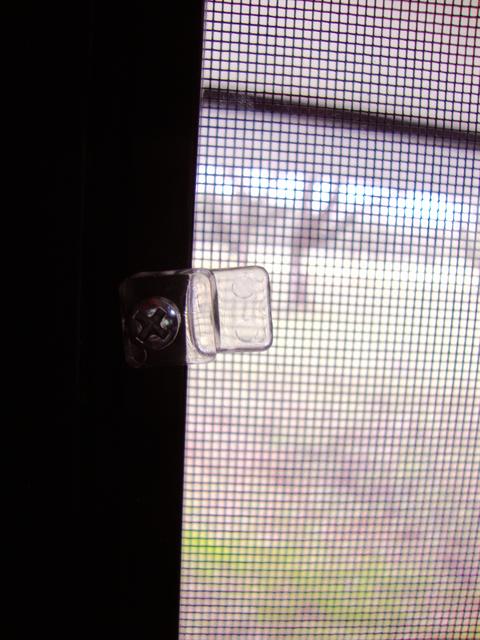
Adjustable picture hanging clips (1/8"), #6 x 1/2" sheet metal screws, and a couple 1/4" diameter felt bumpers finished the job.
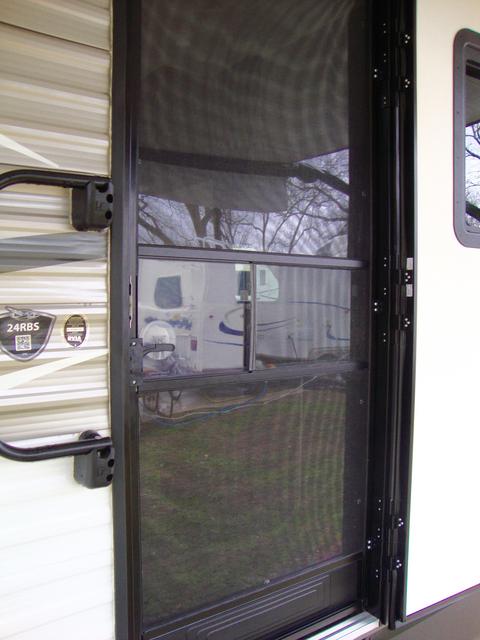
The picture hanging clips were installed so the plastic offset rested against the Lexan panel, and the screw came thru the opposite side of the clip. The clips 1/8" offset worked perfectly with the door frame. I attached the felt bumpers to the clips that were installed along the horizontal screen door frame.
Clips I used: https://www.lowes.com/pd/Hillman-6-P...angers/3036531
Bob
__________________
2016 GM 2500HD 6.0L/4.10
2018 Jay Flight 24RBS
2002 GM 2500HD 6.0L/4:10 (retired)
2005 Jayco Eagle 278FBS (retired)
1999 Jayco Eagle 246FB (retired)
Reese HP Dual Cam (Strait-Line)
|
|
|
|
|
02-23-2018, 06:54 PM
|
#98
|
|
Senior Member
Join Date: Jun 2016
Location: Mechanicsville
Posts: 1,479
|
How do you get air via the screen door? Do you have to take out the Lexan panels when you want air to come through the door?
Quote:
Originally Posted by Rustic Eagle
Tackled installing the three Lexan panels into my screen door today, and overall the install went without any issues. The screens remain, the panels were installed on the 'interior' side of the screen door. I purchased the standard clear 1/8" Lexan, not the higher UV grade material.
I cut the Lexan widths so both sides would insert into the screen door's existing vertical tracks. I bowed the Lexan panel slightly in-order to get both panel side edges to seat into the door's vertical track(s). The top/bottom edges of the Lexan panels were cut to be flush (resting on bottom door frame surface opening) with their respective top/bottom door frame surface.
Adjustable picture hanging clips (1/8"), #6 x 1/2" sheet metal screws, and a couple 1/4" diameter felt bumpers finished the job.

The picture hanging clips were installed so the plastic offset rested against the Lexan panel, and the screw came thru the opposite side of the clip. The clips 1/8" offset worked perfectly with the door frame. I attached the felt bumpers to the clips that were installed along the horizontal screen door frame.
Clips I used: https://www.lowes.com/pd/Hillman-6-P...angers/3036531


Bob |
__________________
Erroll and Mary Doss and Duffy (RIP)
2018 Jayco Redhawk 22J
2014 F150 SC, 4x4, HD Pkg, Sterling Gray
|
|
|
|
|
02-23-2018, 09:04 PM
|
#99
|
|
Moderator Emeritus
Join Date: Apr 2011
Location: Michigan
Posts: 9,424
|
Atlee,
Yes.
I had screen door panels on my retired Eagle for 10 years and very seldom needed to remove the door panels due to air circulation issues, open windows did the job. When boondocking I would remove the top panel if interior temps warranted it and ran a 12v fan....., not a big deal.
Since I camp year round (winter in Texas Hill Country) most of my extended travel destinations the panels don't require removal.
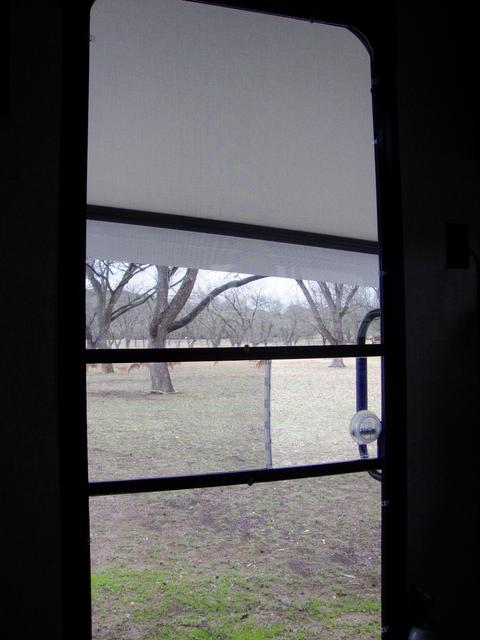
In my case I like having the added light (and view) while running the A/C or furnace.
Bob
__________________
2016 GM 2500HD 6.0L/4.10
2018 Jay Flight 24RBS
2002 GM 2500HD 6.0L/4:10 (retired)
2005 Jayco Eagle 278FBS (retired)
1999 Jayco Eagle 246FB (retired)
Reese HP Dual Cam (Strait-Line)
|
|
|
|
|
03-02-2018, 06:03 PM
|
#100
|
|
Junior Member
Join Date: Feb 2018
Location: Williamsburg
Posts: 18
|
Quote:
Originally Posted by Rustic Eagle
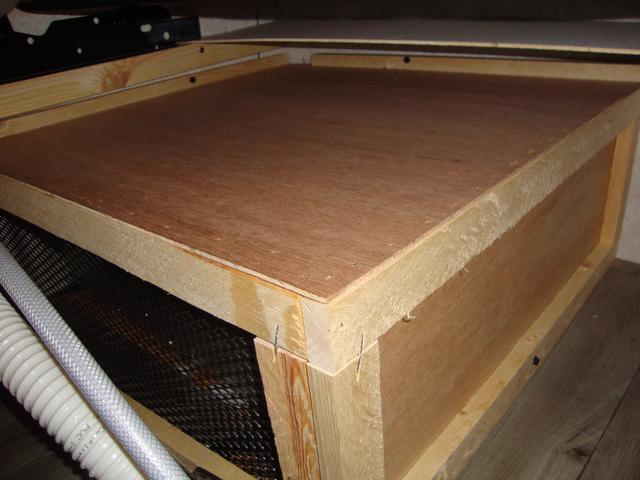
Tackled closing off the bed storage/pass-thru storage and added insulation. The intent of the insulation was to cover those little open areas (to the bedroom) and provide some cold air protection.
Closed off area that also adds support under the three Jayco bed platform 2x2's.....,

The three exposed OEM 2x2's are the Jayco installed "stiffeners" attached to the plywood bed platform......,


Bed platform hinge area......,

View with bed raised in bedroom......,

Bob |
I put a beautiful divider in my new 24rbs today but forgot to account for the three stiffeners. Doh!!!
Sent from my SM-G955U using Tapatalk
__________________
2018 Jay Flight 24RBS
2012 Dodge Ram 1500 Outdoorsman 4x4, 5.7, 3.92
|
|
|
|
|
|
 Posting Rules
|
You may not post new threads
You may not post replies
You may not post attachments
You may not edit your posts
HTML code is Off
|
|
|
|
 » Recent Threads
 |
|
|
|
|
|
|
|
|
|
|
|
|
|
|
|
|
|
|
|
|
|
|
|
|
|
|
|
|
|
|
|
|
|
|
|
|
|
|
|
|
|


 Linear Mode

