Hi everyone...very new to the forum (Just bought our new 2020 camper on the way home from Daytona 1 week ago)! Upgraded from a KZ Spree 14 footer so the extra room will be appreciated. Got what we consider a very good price so...so far so good!
Got home and started going over the mods we will be doing (most of the standard mods for this camper, so you know them already) except I couldn't find any mods to mount shelves in the back closet. We had them in the KZ, but the closet was much shallower, so that technique wouldn't work. I spent yesterday pondering this.
The problem is that there is VERY little that is strong enough to use to mount anything in that closet. As I explored, you have an occasional stud in the back, 1 stud on the outside (where the hangar bar is mounted) and the inside wall which I suspect, while not solid, can be connected to (along with where the hanger mount is connected there).
KZ had the same problems so we solved that by using the Rubbermaid closet shelf system and mounting the hangers on the frame for the door and putting the shelve supports pointing towards the back of the trailer. Well, that was only an 18" deep closet, so the 16" shelves worked well. THIS closet is 28 inches deep or so, which would leave a large gap behind the shelves...not acceptable. Let the brainstorming begin.
Sorry for the huge images...no idea how to resize them

.
NOTE: I am not a carpenter by any means. Everything I know is self taught and I am only YouTube Certified. That said, I like making things work. Enough of the stories...here is what I did!
Basically, I make a frame on the inside of the closet and used existing structure to support it.
Key Pieces:
Rubbermaid mounting bars, shelves supports for 16" shelves and of course, shelves
3 8' pieces of 1x3 wood
4 straight connecting strips
6 L brackets
#8 9/16 self tapping screws
#10 1" metal screws (the same ones connecting the hanger bar to walls)
#8 1 5/8 drywall or wood screws
I cut 2 pieces of 1x3 for the height from the bottom shelve to the trim on the ceiling (my measurement was 55 7/16. I also cut 2 pieces to span the upper corners from the rear wood pieces to the front of the door framing (mine was 25 3/8 and you want these tight).
Predrill holes when possible. (Looking into closet) Left top of back wall had a little stud or something that I used a 1" screw to mount to, and the lower part was mounted to shelf using an L Bracket. Mount the L bracket close to outside wall.

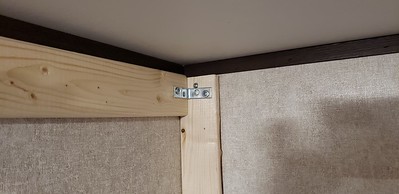
The other side I mounted in conjunction with the wood going to the front frame. I mounted the L bracket thru the side wall to the bathroom with 1 " screw, then screwed the other side to the vertical piece with 9/16 screw. Bottom was secured, once again, with an L bracket to the lower shelf. Mount the L bracket close to bathroom wall.

Key here is the upper support pieces extending to the front frame. Since there is little to no support for weight pulling forward, we are going to provide that support. This is why the pieces should be fairly tight fitting. A. They lean against the existing closet frame (that nice 1x1 piece of wood) and B. We will secure them in place with the straight brackets.

I also drilled with 1" screw straight above where the hanger bar was mounted for further support.

I also mounted a piece up wood spanning the upper back wall between the 2 uprights just to prevent them slipping inward.

Lastly I cut the Rubbermaid uprights to length, mounted to wood uprights (now you will understand why we put the lower L Brackets to the outside) and I think you can figure out the rest.

I have put 25 lbs on each shelf and things seem to stay put, so I'm pretty happy and I will NEVER be putting that much weight on those going down the road.
I hope I have explained this sufficiently for everyone, but if you have any questions...feel free to ask! Thanks for letting this newbie babble a bit!!
Tracy R


 Linear Mode


