 |
 05-01-2023, 10:22 AM
|
#1
|
|
Senior Member
Join Date: Jun 2022
Location: Eureka
Posts: 437
|
Installing SeeLevel II tank monitor
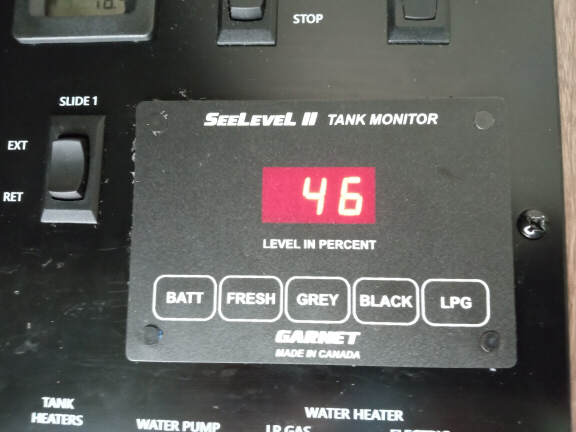
2022 166FBS SeeLevel II project done! Tackled for two reasons: Factory panel died, so rather than pay to replace (I have no warranty) I went for better accuracy, and I also was under there doing preventive bolting of the FW tank supports. Basic 709 kit is monitor, 3 sensors (one shown cut to 4 segments) and wire harness. 4 wires, ground, 12V+ and sensor, plus an LPG connection not usable with our tanks. RVUpgrades.com is the official distributor, and appears to have the best price/selection.
Monitor mounted above standard switch panel.
2022 166FBS. Hard to tell from the schematics, but the FW tank looks similar for the 171 and 199.
SeeLevel II placement, fresh water tank. Each tank has its own difficulties. For the water tank, front and back are out because they are covered by a cross-pattern of steel, and Garnet advises that metal should be at least 2 inches away from the face of the sensor. The factory sensors are on the door side, and the tank is only about 2 inches from the frame, which is less distance than I could possibly maneuver in. Uncovering it, though, got me the red wire that goes to the control panel. So, the driver side it is, where I had about 4 inches of clearance. When a sensor is not full height for the tank, the recommendation for the FW tank is to place it at the bottom (of the side). With this placement the tank is close to empty (estimate 5 gallons) when it reads 0%, but is not close to full (at least 10 gallons, probably more) when it reads 100%
In hindsight, I might have been able to make it work with 5 segments instead of 4. I would certainly advise that as a trial for anyone else, as if it doesn't work you can always cut one off. Garnet recommends taping it in place for testing before pulling the backing off and permanently affixing it. I was so sure that I would have to cut it to four that I did it first. Not the best thought I've had.
2022 166FBS. "Front view" is same for both tanks, but on the 171 and 199 the schematics show the pipes facing each other, so the grey tank would be a back view. Our grey and black tanks have a sloping profile, both back-to-front, and side to center. My hand-drawn representation is below. This presents a problem with sensor placement. In terms of fluid depth from the bottom, 1/3 occurs much more quickly than the next third, and the final third is the slowest. It would be possible to compensate for that with the three discrete sensors, but by visual inspection it does not appear that was done. I no longer have a working original panel so I can't confirm. It is definitely be a problem with the Seelevel II, as it is purely linear. One will have to keep in mind that the first 6% is not truly 6% of the tank capacity, and so on.
SeeLevel II grey tank sensor placement. The waste tanks are deepest at the outflow. Left side has the three factory sensors, and they are staggered but close enough together horizontally that the SeeLevel II sensor will not quite fit between them, so right side is the choice. Two issues: First is that the front of the grey tank is just behind the axle, so you can't open the underbelly right up to it. Instead have to work from the back of the FW tank and reach in a ways.
Second issue is the 2x2 angle iron at the top, which is what the tank is suspended from. Garnet advises that metal should be at least 1 inch from the top and bottom of the sensor, and 2 inches from the face. Both impossible in this situation. Putting the sensor all the way to the top would butt into metal, and the face of that steel is a bit over an inch from the face of the sensor.
I called Garnet before I did this and had a good talk with a tech. He advised that it would probably be OK. It is of most concern when a tank is very thick-walled, and the sensor "reads" the metal as fluid level. Our short tanks are not very thick. All I could do was try it, and I'm happy to say that the sensor reads all segments fairly well. I did keep the top of the sensor down a bit from the top, which means it will read full before it is actually full, but the top is still higher than the factory sensor where the full sensor is also not at the top.
2022 166FBS. On the 171 and 199 the schematics show the pipes facing each other, so both grey and black sensors would require only one cut in the underbelly. The axle would also not come into play.
Black tank sensor had a unique problem caused by the flush line. Tight squeeze in between that and the drain. With some pressure I was able to get that lifted corner to stick down. They put a good 3M stickum on the back, so once down it should stay. I ended up putting eternabond over each sensor to make it less likely for anything to lift.
16 levels, shown for the grey tank with shore water at 40PSI and the kitchen faucet open with no sprayer attached. Timings have some variables because with 1/4-inch resolution the waves caused by the water dropping in will make readings "bounce." First reading is long because the sensor is not at the bottom of the tank, and 100% is likewise not actual full level. Figure 10 to 20% more, but can't be precise.
__________________
2022 Jay Feather Micro 166FBS
2019 F150 SuperCrew Short Bed 2.7L
Andersen WDH, 1000 lb Sumo Springs
Past: 2015 Winnebago View, 2004 Blue Bird M380, 1990 Blue Bird WB40, 2003 Safari Zanzibar, 1998 Safari Sahara

|

|

|
|
05-01-2023, 10:51 AM
|
#2
|
|
Junior Member
Join Date: Jan 2022
Location: Huntsville
Posts: 20
|
Nice project Don.
While under there did you happen to get any photos of the routing and connection of the black tank flush to the black tank?
My black tank flush is completely stopped up. It is not the backflow prevention valve or any kink/blockage that I can see within the trailer. I suspect it is blocked at the spray nozzle(s?) in the tank although I would be surprised as my black tank has had almost nothing added that would cause blockage.
__________________
2022 Jay Feather Micro 166FBS
2018 F150 XLT 4X4 5.0
Past: 2014 Arctic Fox 990
2006 RAM 3500 Dually (still have)
|
|
|
|
|
05-01-2023, 11:04 AM
|
#3
|
|
Senior Member
Join Date: Jun 2022
Location: Eureka
Posts: 437
|
In the next-to-last pic, the flush connection is on the right. White fitting with screw on conection.
__________________
2022 Jay Feather Micro 166FBS
2019 F150 SuperCrew Short Bed 2.7L
Andersen WDH, 1000 lb Sumo Springs
Past: 2015 Winnebago View, 2004 Blue Bird M380, 1990 Blue Bird WB40, 2003 Safari Zanzibar, 1998 Safari Sahara
|
|
|
|
|
07-21-2023, 07:47 PM
|
#4
|
|
Senior Member
Join Date: Dec 2019
Location: Corona
Posts: 267
|
Nice job Don! I too have the Garnet See Level, I installed mine several years ago. Works great and I am a fan!
Good to see more of these out there - IMO these should be standard.
__________________
TRADED IN: 2019 Jay Flight SLX 7 195RBW
MODS: Dual GC2 LiFePO4 System, BAL (4) Stabilizers, Hengs vent fan, Dual Propane conversion, Furrion FOSO7TASF Rear Camera, Digital Thermostat, See Level 709P3W1003 Tank Monitor System, 200w solar panels, other cool things.
|
|
|
|
|
07-21-2023, 09:42 PM
|
#5
|
|
Senior Member
Join Date: Jun 2022
Location: Eureka
Posts: 437
|
Thanks! I've had them on prior RVs, but they were a lot easier to install than on the Micro.
__________________
2022 Jay Feather Micro 166FBS
2019 F150 SuperCrew Short Bed 2.7L
Andersen WDH, 1000 lb Sumo Springs
Past: 2015 Winnebago View, 2004 Blue Bird M380, 1990 Blue Bird WB40, 2003 Safari Zanzibar, 1998 Safari Sahara
|
|
|
|
|
07-22-2023, 07:27 AM
|
#6
|
|
Senior Member
Join Date: Apr 2022
Location: Beaufort
Posts: 198
|
At first I rejected the See Level because our black tank is stepped with a steel rail supporting it by the step about 1/2 way up.
But on thinking about it I decided its only the top half that's important so I just put the sensor there. So it reads zero until half full.
I had extensive problems with the communications. Had one sensor replaced. They require a good local ground and mine had problems sharing a ground.
It works about 80% of the time but so long as you have a mental guide as to what it should read you can reject the bogus readings. 3 stars out of 5.
I was stuck with it after installing since it replaced the old system on the panel.
|
|
|
|
|
07-22-2023, 11:01 AM
|
#7
|
|
Senior Member
Join Date: Jun 2022
Location: Eureka
Posts: 437
|
As I said I needed to do something, since my original panel failed. I considered the difficulty of installing the SeeLevel II on the Micro, then looked at the Mopeka unit. They've made ultrasonic units for propane tanks for awhile, but recently came out with water tank units for depths up to 48 inches. I inquired whether they would work on a pancake 6-inch tank, and they said it probably wouldn't work well.
Since then, there are a modest amount of real-world reviews and videos that say they work fine on 6-inch grey and FW tanks, and fairly well on black (which the manufacturer says won't work). They would be much easier to install on the Micro and probably other trailers.
__________________
2022 Jay Feather Micro 166FBS
2019 F150 SuperCrew Short Bed 2.7L
Andersen WDH, 1000 lb Sumo Springs
Past: 2015 Winnebago View, 2004 Blue Bird M380, 1990 Blue Bird WB40, 2003 Safari Zanzibar, 1998 Safari Sahara
|
|
|
|
|
07-23-2023, 12:58 PM
|
#8
|
|
Senior Member
Join Date: Dec 2019
Location: Corona
Posts: 267
|
Ann-Marie: I have had a See Level for years and didn't know that you could hook it up to your propane tank. How does this work? How does it measure dual tanks?
Your display looks different than mine. I have red seven segment LED readout that I hate (need to source a different color LED readout and swap it out) but yours looks like LCD. Is that the case?
__________________
TRADED IN: 2019 Jay Flight SLX 7 195RBW
MODS: Dual GC2 LiFePO4 System, BAL (4) Stabilizers, Hengs vent fan, Dual Propane conversion, Furrion FOSO7TASF Rear Camera, Digital Thermostat, See Level 709P3W1003 Tank Monitor System, 200w solar panels, other cool things.
|
|
|
|
|
07-23-2023, 01:06 PM
|
#9
|
|
Senior Member
Join Date: Apr 2022
Location: Beaufort
Posts: 198
|
So far as I know they are all digital LED display but there may be older versions.
The LPG readout only works on installed propane tanks that already have a dial gauge that works from a mechanical float inside the tank. You unsnap the dial indicator that is magnetically coupled to the float and replace it with an indicator that has electrical connections to an internal resistor. There is a calibration procedure to match the SeeLevel to the resistor.
|
|
|
|
|
07-23-2023, 01:13 PM
|
#10
|
|
Senior Member
Join Date: Jun 2022
Location: Eureka
Posts: 437
|
As Ann-Marie said, only works on installed horizontal tanks with a readout. In the units I've had before, the tanks already had a sender that showed inside, just like a traditional 3 or 4-segment tank sensor setup, so just like the tanks you just connect the wires to the SeeLevel and then go through the calibration process. Nothing available for portable tanks. Would be nice if they worked with Mopeka to be able to read their ultrasonic LPG sensors.
__________________
2022 Jay Feather Micro 166FBS
2019 F150 SuperCrew Short Bed 2.7L
Andersen WDH, 1000 lb Sumo Springs
Past: 2015 Winnebago View, 2004 Blue Bird M380, 1990 Blue Bird WB40, 2003 Safari Zanzibar, 1998 Safari Sahara
|
|
|
|
|
07-24-2023, 12:35 PM
|
#11
|
|
Senior Member
Join Date: Dec 2019
Location: Corona
Posts: 267
|
Well that's a bummer. I got excited for a moment.
Thanks for clarifying how the LPG sensor works!
__________________
TRADED IN: 2019 Jay Flight SLX 7 195RBW
MODS: Dual GC2 LiFePO4 System, BAL (4) Stabilizers, Hengs vent fan, Dual Propane conversion, Furrion FOSO7TASF Rear Camera, Digital Thermostat, See Level 709P3W1003 Tank Monitor System, 200w solar panels, other cool things.
|
|
|
|
|
10-19-2023, 10:57 AM
|
#12
|
|
Senior Member
Join Date: Sep 2021
Location: Queen Creek
Posts: 691
|
Great job on this Don! I have thought about doing this as well, has it held up so far? Also how much of a pain in the A$$ was it getting the plastic bottom off to see the tanks? Or how did you handle that?
__________________
2022 Jay Feather Micro 166FBS
2021 RAM 1500 5.7 eTorque
|
|
|
|
|
10-21-2023, 09:49 AM
|
#13
|
|
Senior Member
Join Date: Jun 2022
Location: Eureka
Posts: 437
|
Tom, it was a real pain to install. I would certainly recommend the Mopeka instead, at least for fresh and grey. For the underbelly, after earlier removal experience, now I just cut open where I need to be, and tape it back with underbelly tape placed over Gorilla tape. That part works fine. I did the tank support bolts at the same time. With a Mopeka just a small flap cut would work.
__________________
2022 Jay Feather Micro 166FBS
2019 F150 SuperCrew Short Bed 2.7L
Andersen WDH, 1000 lb Sumo Springs
Past: 2015 Winnebago View, 2004 Blue Bird M380, 1990 Blue Bird WB40, 2003 Safari Zanzibar, 1998 Safari Sahara
|
|
|
|
|
10-21-2023, 09:55 AM
|
#14
|
|
Senior Member
Join Date: Sep 2021
Location: Queen Creek
Posts: 691
|
Were the tanks loose or just going through correcting things while you were in there? I have been thinking about possibly adding additional support on all the tanks but not sure if its needed..
__________________
2022 Jay Feather Micro 166FBS
2021 RAM 1500 5.7 eTorque
|
|
|
|
|
10-21-2023, 10:10 AM
|
#15
|
|
Senior Member
Join Date: Jun 2022
Location: Eureka
Posts: 437
|
Just preventive. Those self tapping screws to hold all that weight are a disaster waiting to happen. I used 1/4-20 Grade 8 bolts, washers, and lock nuts. Using that size I was able to put a tap in the original holes, so the bolts are screwed into the supports, then the lock nut behind that.
__________________
2022 Jay Feather Micro 166FBS
2019 F150 SuperCrew Short Bed 2.7L
Andersen WDH, 1000 lb Sumo Springs
Past: 2015 Winnebago View, 2004 Blue Bird M380, 1990 Blue Bird WB40, 2003 Safari Zanzibar, 1998 Safari Sahara
|
|
|
|
|
10-21-2023, 10:12 AM
|
#16
|
|
Senior Member
Join Date: Jun 2022
Location: Eureka
Posts: 437
|
The grey and black tanks have molded lips that run up onto the frame. Under supports for those are just loose aluminum strips designed to keep it from falling if the tank itself broke.
__________________
2022 Jay Feather Micro 166FBS
2019 F150 SuperCrew Short Bed 2.7L
Andersen WDH, 1000 lb Sumo Springs
Past: 2015 Winnebago View, 2004 Blue Bird M380, 1990 Blue Bird WB40, 2003 Safari Zanzibar, 1998 Safari Sahara
|
|
|
|
|
 Posting Rules
|
You may not post new threads
You may not post replies
You may not post attachments
You may not edit your posts
HTML code is Off
|
|
|
|
 » Recent Threads
 |
|
|
|
|
|
|
|
|
|
|
|
|
|
|
|
|
|
|
|
|
|
|
|
|
|
|
|
|
|
|
|
|
|
|
|
|
|
|
|
|
|


 Linear Mode

