 |
|
 11-21-2016, 07:38 AM
|
#1
|
|
Senior Member
Join Date: Aug 2016
Location: Middle, TN
Posts: 1,098
|
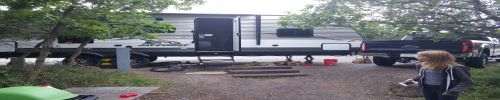
Hummingbird Is Finally Home!
It was a long 16 week wait!
The FJ pulled it remarkably well (at dry weight of course). The final dry weight came in around 3,200 lbs (17RK ordered with every factory option).
The Andersen 'No Sway' hitch works really well with this combo of TV & TT.
I've been working around the clock for the past two days installing all of the accessories that I bought for it. Got the battery disconnect switch, LED back-up lights, Progressive Industries EMS and Dometic Elite slide topper installed, next is mounting and wiring the rear view camera.
I bought a 10 gauge/20 amp 100' extension cord to give us some temporary power while I run a dedicated 50 amp circuit down to the parking pad. I can run a ceramic heater on low (750W) and the lights and AV equipment, but if I turn the heater up to high (1500W) the surge protector drops everything out due to voltage drop. The heater on low is more than enough to keep it warm inside though.
If it's plugged into 120V is it OK to leave my battery in the TT through the winter? I have the battery disconnect switch turned to the on postion, I'm hoping that this will allow the battery to remain charged.


|

|

|
|
11-21-2016, 07:46 AM
|
#2
|
|
Senior Member
Join Date: Nov 2011
Location: Where ever the boss says we're going.
Posts: 16,124
|
Congrats. I always left our units plugged in 24/7, just besure to check the battery water level periodically
__________________
 DISNEY LOVERS
|
|
|
|
|
11-21-2016, 03:35 PM
|
#3
|
|
Senior Member
Join Date: Aug 2016
Location: Middle, TN
Posts: 1,098
|
|
|
|
|
|
11-21-2016, 03:51 PM
|
#4
|
|
Senior Member
Join Date: Aug 2016
Location: Denver
Posts: 1,580
|
That's an awesome setup you have. If I buy a second camper for some reason, that's on my short list for sure. We're about 3 years out from being 'empty nesters' and I'd love having something like that stored at home for impromptu trips.
Yes, leave it plugged in if you have the option and as Grumpy says, check your battery once in a while... every few weeks. I was pretty surprised how low the 'fluid' was in my brand new battery after just a half season of use with maybe a dozen charge cycles on it. Not sure how cold it gets where you are, but we see sub zero here and I do garage my battery so it doesn't freeze solid.
I'm envious of people that have a camper like that where keeping it at home is a solid option in a typical neighborhood environment.
__________________
2016 27BHS Elite
2012 F-150 EcoBoost / Max Tow (Sold)
2017 'Blue Jeans' 6.2 F-250 Lariat 4.3 gears.
|
|
|
|
|
11-21-2016, 04:07 PM
|
#5
|
|
Senior Member
Join Date: Aug 2016
Location: Middle, TN
Posts: 1,098
|
Thanks for the info, the owner's manual is very generic and it seems that nobody knows a lot about these since they're so new.....including Jayco ")
Some things that I've had to figure out on my own:
1. I'm not really sure what "rear view camera ready" is implying, but there's no switch in the TT for a constant hot and there's not even pigtails off of the center marker light in the back. Nobody at Jayco or the dealership could tell me one thing that was camera ready about this thing.....and I think I figured out why. What they did do was drill a hole in a stiffener right below the center marker light so you can fish a power and ground wires down from the light. I used a long zip tie as a fish tape to pull the wires back up. had to mount the camera fairly low due to the curvature of the back end, I still have not done fine tuning as far as aiming the camera, I'll report back what I find.
2. If you want to run back-up lights, thankfully Jayco did bring the center pin wire from the 7-pin into the junction box behind the battery. It was an unused orange wire on mine, an ohm meter made short work of figuring this out. Thank you Jayco, had they opted to not go ahead and run the wire to the junction box it would've been a mess.
3. The Progressive Industries EMS fits perfect behind the false panel in the cabinet closest to the refrigerator and it's an easy shot out for the remote display. The main poser is right there, mine was orange romex wire.
4. The D&W Super-Slider sewer hose storage fit perfect above the bumper and holds my Camco hose with fittings attached. The tube is designed to be mounted below the trailer, but having sprung for the Baja option for some much needed ground clearance for our taste, it would've defeated the purpose. Where it's at it is up out of the way and easy to access.
5. If you lose 12vdc power and everything looks good in the indoor fuse panel, there's a 30-amp fuse that sticks out of the side of the main power junction box behind the battery. It's a 4-square electrical box that's painted black and mounted to the frame, the fuse holder is sticking out of the side of this box. If you limit out the power tongue jack it will likely blow the fuse....
6. The small redish wire that's going directly to the positive terminal of the battery, along with the 8 gauge main TT power wire is for the emergency brake module, I opted to not route this through the battery disconnect switch in case I forgot to turn on the switch prior to towing.
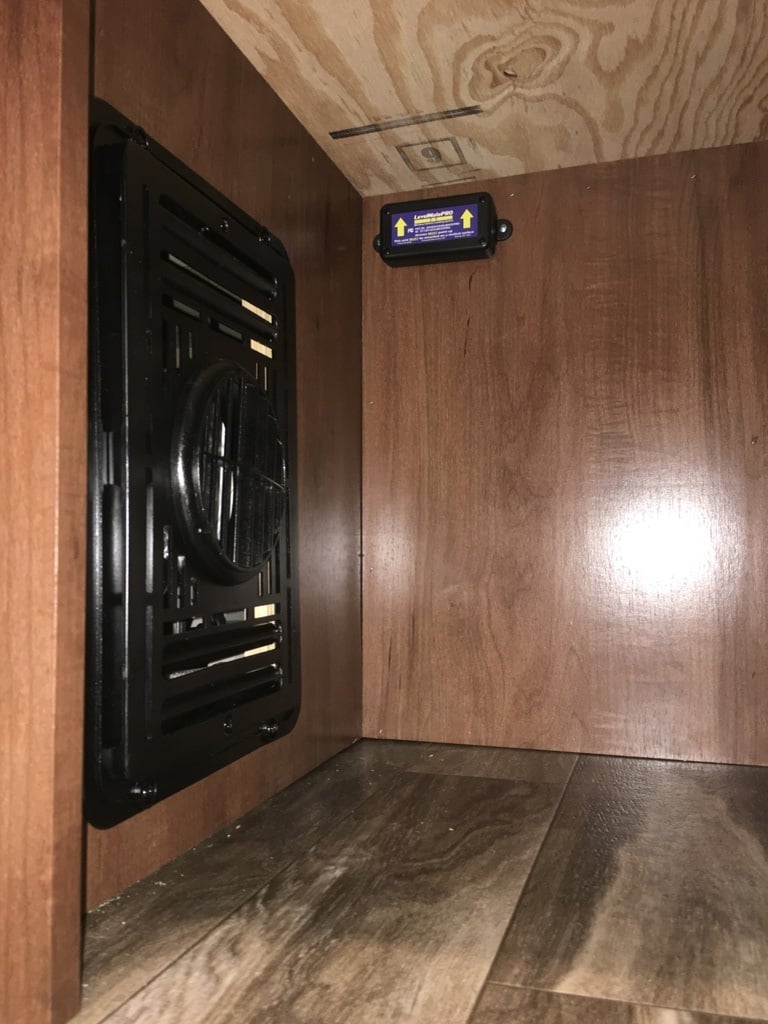
One more mod, I installed a LevelMatePRO. Mounted the sending unit under the bed up front.
|
|
|
|
|
11-21-2016, 11:03 PM
|
#6
|
|
Senior Member
Join Date: Nov 2016
Location: New Westminster BC
Posts: 117
|
Nice setup, keep us posted. I can't wait to get my RK out too.
|
|
|
|
|
11-23-2016, 10:57 AM
|
#7
|
|
Senior Member
Join Date: Aug 2016
Location: Middle, TN
Posts: 1,098
|
Refrigerator Trim Help
During the walk-thru I noticed that the black plastic trim piece on the top of the refrigerator door was cloudy white. The service advisor said that it was from the clear protective film and that it would wipe off with cleaner.
I've tried goofoff and it didn't touch it, I'm thinking that it's something that may not be able to be wiped off. I scrubbed pretty hard with a cloth and it didn't really make much improvement.
Anyone have any advice / opinions?
Thanks.


|
|
|
|
|
11-23-2016, 11:00 AM
|
#8
|
|
Senior Member
Join Date: Oct 2016
Location: Jonesboro
Posts: 130
|
You could just put a coat of silver paint in it. ��
|
|
|
|
|
11-23-2016, 11:03 AM
|
#9
|
|
Senior Member
Join Date: Aug 2016
Location: Middle, TN
Posts: 1,098
|
Quote:
Originally Posted by Mbranscum

You could just put a coat of silver paint in it. ��
|
Just hate to start painting on a 3 day old trailer, I may try one more cleaner and if that doesn't work just let the dealership figure it out.
I'm glad I brought it up during the walk-thru now.
|
|
|
|
|
11-23-2016, 11:10 AM
|
#10
|
|
Senior Member
Join Date: Aug 2016
Location: Middle, TN
Posts: 1,098
|
Just found the Meguiar's makes a black plastic trim restorer that I may try.
|
|
|
|
|
11-23-2016, 06:01 PM
|
#11
|
|
Member
Join Date: Sep 2016
Location: Port Moody
Posts: 59
|
That is a great set up!
I will be using some of your ideas in the spring, especially the Dometic Elite slide topper.
|
|
|
|
|
11-25-2016, 03:03 PM
|
#12
|
|
Senior Member
Join Date: Aug 2016
Location: Middle, TN
Posts: 1,098
|
Since we don't really see a need to have a TV outside, I decided to fire up the forge today and turn the exterior TV mount into something a little more handy for our needs - a rack with hanging hooks for towels, pots, trash bags, hats, or whatever other light weight items we might need to hang.
I kept it as light as possible and it still turned out to be very sturdy....us blacksmiths have been known to go overboard on things at times 


|
|
|
|
|
11-26-2016, 12:16 PM
|
#13
|
|
Junior Member
Join Date: Oct 2016
Location: Kansas City
Posts: 23
|
Looks great I was wondering if i should find a cheap LED TV for outside or not......
|
|
|
|
|
11-26-2016, 02:35 PM
|
#14
|
|
Senior Member
Join Date: May 2016
Location: Dacono
Posts: 255
|
Good looking rig! Congrats!
|
|
|
|
|
11-26-2016, 07:50 PM
|
#15
|
|
Senior Member
Join Date: Aug 2016
Location: Middle, TN
Posts: 1,098
|
Decided that we would be better off with insect screens over the vents for our water heater, furnace and refrigerator.
For the furnace door I bought a Camco WH500 and for the water heater I went with a Camco FUR500.
On the refrigerator vents I couldn't find any products available for the Hummingbird, our two vents each have six vent slots that are 17' long each (other than the very top vent slots that are only 13" long). Even if Camco did make them, judging from the prices on the other models it would cost upwards of $80 to cover all twelve vent slots. So I decided to make my own, since I already had the glue gun and glue sticks, the total project cost me $10.42 at Lowe's.
I purchased three 3' long black gutter guard screens. I was first going to use window screen, but since the upper vent serves the condensing coil on the refrigerator I was afraid the mesh didn't have enough free area and could negatively impact the performance of the refrigerator. The gutter screens were a good compromise in my opinion, they won't keep something as small as ladybugs out, but they should deter Wasp and Mud Daubers and will definitely help keep mice and our friendly chipmunks from taking up residence in there for the winter.
For the 17" long vents I cut the screen into strips that were 2" wide by 17-1/2" long and for the shorter top vents I cut them 2" wide by 13-1/2" long. I marked the depth of the vent slots and put them in my vice and broke the screen to about a 120 degree angle. Next I formed the screen to the vent slots and hot glued them in on the back side, once the glue dried I bent the ends around tight and hot glue them as well. The trick is to keep the ends tucked in as tight as possible since there's not a lot of side to side clearance between the vent covers and the openings.
In the end they may not do anything but simply allow me to sleep better at night  . The back sides aren't necessarily "pretty", but the business side looks pretty good to me.


|
|
|
|
|
11-26-2016, 08:31 PM
|
#16
|
|
Senior Member
Join Date: Nov 2016
Location: New Westminster BC
Posts: 117
|
Wow 
|
|
|
|
|
11-27-2016, 07:13 AM
|
#17
|
|
Senior Member
Join Date: May 2016
Location: Dacono
Posts: 255
|
Nice job!.
I must add in though... I am drooling over your garage!
|
|
|
|
|
11-27-2016, 02:57 PM
|
#18
|
|
Senior Member
Join Date: Sep 2016
Location: Texas
Posts: 157
|
Great job. I pick up my 17RB in a couple days. What are some things I will need before leaving the parking lot? I already have my Andersen WDH. I'm pulling with my 2014 Jeep 4dr Wrangler.
Sent from my iPad using Tapatalk
|
|
|
|
|
11-27-2016, 03:08 PM
|
#19
|
|
Senior Member
Join Date: Aug 2016
Location: Middle, TN
Posts: 1,098
|
Quote:
Originally Posted by Chickeneye
Great job. I pick up my 17RB in a couple days. What are some things I will need before leaving the parking lot? I already have my Andersen WDH. I'm pulling with my 2014 Jeep 4dr Wrangler.
Sent from my iPad using Tapatalk
|
I'd say just the basics.
1. Leveling blocks - I went with the Andersen Camper Leveler 3604.
2. You'll need the sewer drain hose - I just bought the Camco kit from Amazon.
3. The TT comes with a nice 25' power cord - I didn't realize that it would come with one and purchased a Camco ahead of time....oh well.
4. I'd recommend a 50-30 amp adapter and a 30-20 amp adapter - I bought Camco through Amazon, used the 30-20 adapter when I got it home and still using it until I can get the 50 amp service installed at the parking pad.
5. A level of some form.
6. I purchased mirror extensions for the FJ and removed them before I left the dealer's lot. The Hummingbird is almost the exact same width as the FJ so I can easily see all the way down the sides, including the TT tires with the factory mirrors.
7. There's a perfect spot to install the Andersen frame brackets, but you will need to bring along a couple self-tapping screws to move the emergency break-away brake box forward a couple inches. I did not have to cut the factory Andersen chain length at all. Install and set up way easier than I imagined it would be. The coupler is tight on the ball, so you have to work it a little to get it to latch. Don't tighten the chains before latching the coupler for the first time.
8. I had already installed rear air bags, but didn't have to add any air above every day minimum street pressure, the FJ handled the TT well and felt really good up to 65 MPH, even with 25 MPH cross winds and semis blowing by me.
|
|
|
|
|
11-27-2016, 03:11 PM
|
#20
|
|
Senior Member
Join Date: Sep 2016
Location: Texas
Posts: 157
|
Quote:
Originally Posted by 01tundra
I'd say just the basics.
1. Leveling blocks - I went with the Andersen Camper Leveler 3604.
2. You'll need the sewer drain hose - I just bought the Camco kit from Amazon.
3. The TT comes with a nice 25' power cord - I didn't realize that it would come with one and purchased a Camco ahead of time....oh well.
4. I'd recommend a 50-30 amp adapter and a 30-20 amp adapter - I bought Camco through Amazon, used the 30-20 adapter when I got it home and still using it until I can get the 50 amp service installed at the parking pad.
5. A level of some form.
|
Awesome thank you. I will get on Amazon now.
Sent from my iPad using Tapatalk
|
|
|
|
|
|
 Posting Rules
|
You may not post new threads
You may not post replies
You may not post attachments
You may not edit your posts
HTML code is Off
|
|
|
|
 » Recent Threads
 |
|
|
|
|
|
|
|
|
|
|
|
|
|
|
|
|
|
|
|
|
|
|
|
|
|
|
|
|
|
|
|
|
|
|
|
|
|
|
|
|
|


 Linear Mode

