 |
|
 04-19-2021, 08:14 AM
|
#1
|
|
Junior Member
Join Date: Apr 2019
Location: Boston
Posts: 9
|
Replacing rotted floor - how to remove cabinet/wall?
Hi All-
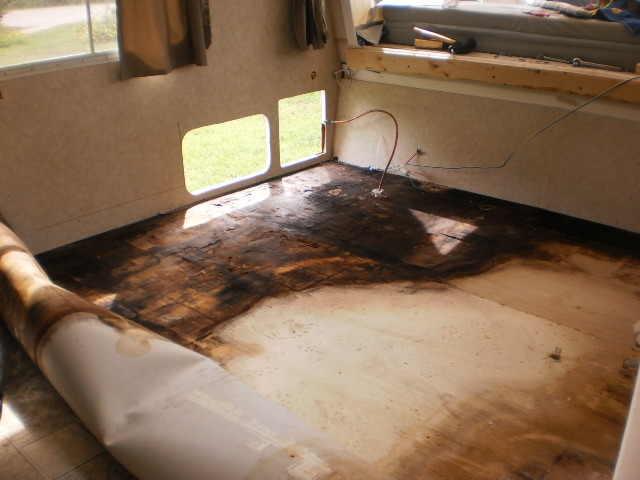
First off, I'm 100% in over my head lol. I bought this 2012 x17z 2 years ago knowing nothing about campers or the warning signs when buying used but have since learned so much lurking on this forum. So thank you! I recently became brave enough to investigate the soft floor from the door into the bathroom and while I figured it would be bad, it's even worse than I thought 
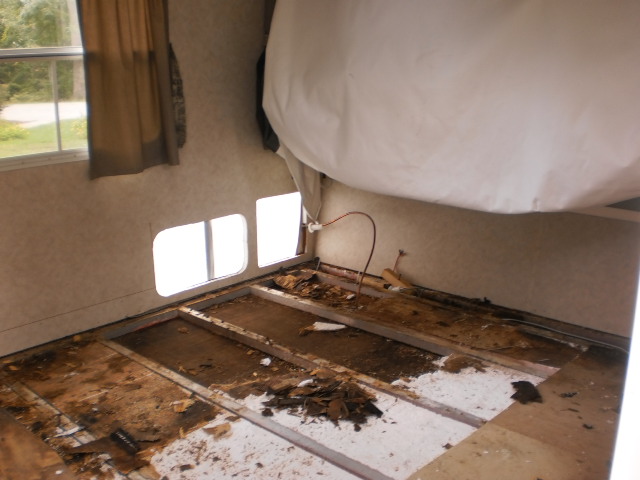
I'm specifically wondering how to remove the back cabinet and, if possible, the bathroom wall. Attaching pics to help visualize these areas.
As for the leak itself, I'm certain it was at least partly due to a crack in the rear tail light but with the extent of this damage I'm going to continue to investigate other sources.
I'm also likely going to have to remove the cabinet under the sink but I'll save that for later....
I did find a couple of other threads (like the one below) that have been really helpful, but I'm hoping any additional guidance for a non-handy person like me  https://www.jaycoowners.com/forums/f...ent-51163.html
Thank you!!
|

|

|
|
04-19-2021, 09:26 AM
|
#2
|
|
Senior Member
Join Date: May 2017
Location: Brunswick
Posts: 491
|
We found a soft floor in our Rockwood Hybrid TT. That was from a storage door that didn't get caulked along the bottom from the factory (none of the storage doors on that unit were caulked along the bottom, our Greyhawk came from the factory the same way). I had a friend help me as we had to remove a few cabinet like structures to remove as well as the dinette and j-fold sofa, the fresh water tank and the hot water heater. In that unit, everything that looked like wood was stapled together. Most of the screws that we removed were from blocking that attached to the floor or walls that the cabinets were then stapled to. After pulling the screws from the blocking, the cabinets came out fairly easily. If there is resistance somewhere, look for some staples. We pulled so many staples out of that thing, I probably could of got a couple dollars at a scrape yard for them all.
-Michael
|
|
|
|
|
04-19-2021, 09:42 AM
|
#3
|
|
Junior Member
Join Date: Apr 2019
Location: Boston
Posts: 9
|
Thanks, Michael! I have heard/read there are staples but good to know there are probably more than I think and to look out for them. I'm going to dig in and start unscrewing what I can see (starting with the bottom to screws in the first picture, I've already removed the door to that storage area). Hopefully as I start to do that it will become more obvious where things are still attached and need to be removed. Fingers crossed.
At this point I'm getting more scared of how to tackle removing the wall  .
Thanks!
Michelle
|
|
|
|
|
04-20-2021, 08:00 AM
|
#4
|
|
Senior Member
Join Date: May 2017
Location: Brunswick
Posts: 491
|
The wall shouldn't be too bad, once you get the cabinets off. Most likely you will need to use a pry bar or putty knife as the luan walls will probably be glued with construction adhesive to the framing as well as stapled. Removing the rotted luan off will be easy, but getting whatever is dry off will probably be harder. If it were me, I'd only replace what I absolutely had to, leaving all the dry wood on the wall. When I replaced the floor in our HTT, I used 1/4" Oak Plywood.
Good luck!
-Michael
|
|
|
|
|
04-20-2021, 10:15 AM
|
#5
|
|
Junior Member
Join Date: Apr 2019
Location: Boston
Posts: 9
|
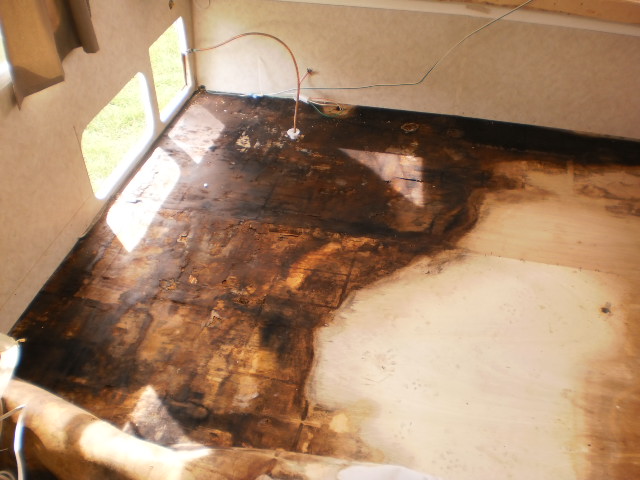
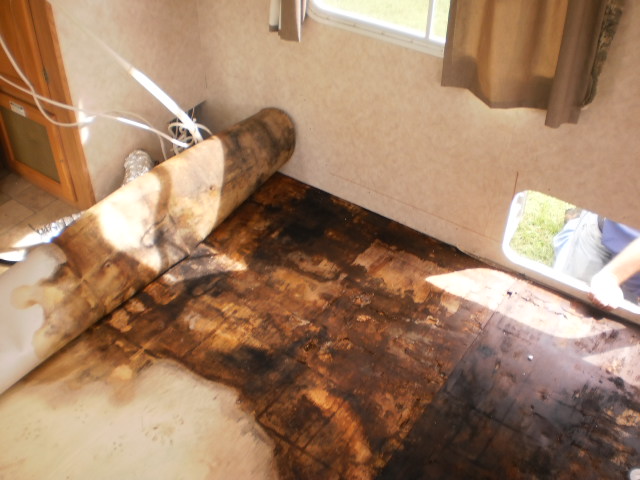
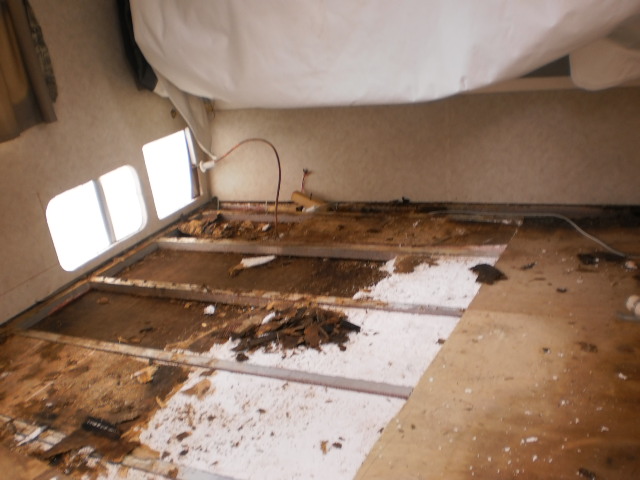
Thanks again. The clue about the staples was really helpful. There are a ton! Once I realized how easy it was to remove the strips on the seams, it wasn't too bad using a putty knife to pry the wall off and as well as start the cabinet facing on the back. I definitely agree with removing what is absolutely necessary... unfortunately, I'm just discovering more and more as I pull back.
The pics below shows some of the progress from yesterday. As I was starting to tackle this, I found it challenging to find any small incremental pics to understand how it might come apart. Posting in case they are helpful for others.


Next up is removing the converter (will be sure to take lots of pics of the wiring) to get the back "cabinetry" out.
Any other bits of advice is always welcome!
Thanks again - Michelle
|
|
|
|
|
04-20-2021, 12:00 PM
|
#6
|
|
Senior Member
Join Date: May 2017
Location: Brunswick
Posts: 491
|
Your pictures bring back bad memories 
Here's my mess:

In this photo, where my buddies hand is is where the water came in. It was all black right there.
Once all the rotten wood and wet foam was removed, I let it dry out for about a month in the middle of a southeast Georgia summer to make sure it was good and dry. Fortunately, that summer the humidity wasn't close to 100% every day
Although the luan under the sub frame was wet, we decided to leave it and just let it dry out. It doesn't offer any support anyway and then I added a few 2x4s acting as I-Beams attached to the trailer's frame for support. Unfortunately, once the vacuum is broken in the floor, it will never be the same. Even with the added I-beams, I added 3, the floor still felt a little soft where the water damage was.
Definitely take lots of pictures of the wiring. I would label which wire(s) go with which fuse and/or breaker, just to be sure.
-Michael
|
|
|
|
|
04-21-2021, 07:15 AM
|
#7
|
|
Junior Member
Join Date: Apr 2019
Location: Boston
Posts: 9
|
Thank you for sharing those! Bad memories though I'm sure a great sense for satisfaction once it was done! It is amazing how a little leak and water can do so much damage...
I'm in the Northeast so humidity is still a couple months out so I'm debating on the bottom layer of luan. It was so wet when trying to chip out the foam that there are some areas of thin layers of it that just tore away so I may not have a choice and will have to tear that out too but I still have some to decide. The more I got into taking things apart I realized it isn't necessarily "difficult" just time consuming to do carefully... though the putting back together part might be another story!
|
|
|
|
|
04-21-2021, 08:10 AM
|
#8
|
|
Moderator Emeritus
Join Date: Apr 2011
Location: Michigan
Posts: 9,424
|
jprs31,
Welcome to JOF
If you contact Jayco Customer Support via e-mail or phone (have VIN handy) they can forward PDF files of the walls, floor, roof, etc., drawings that may be helpful. Also, request the electrical and plumbing drawings for your X17Z.
Moisture intrusion....., had a nasty issue with my prior Eagle TT while it was still under warranty (thankfully):


Bob
__________________

2016 GM 2500HD 6.0L/4.10
2018 Jay Flight 24RBS
2002 GM 2500HD 6.0L/4:10 (retired)
2005 Jayco Eagle 278FBS (retired)
1999 Jayco Eagle 246FB (retired)
Reese HP Dual Cam (Strait-Line)
|
|
|
|
|
04-21-2021, 09:07 AM
|
#9
|
|
Senior Member
Join Date: Oct 2014
Location: Sparwood, BC
Posts: 2,800
|
For some reason the outside seal where the wall meet the floor failed majorly on some Jay Feather models. Similar happen with the roofs, except the roofs have aluminum frames.
Early on I replaced the seals on my 29Y with butyl tape which is a much better seal.
The aluminum framed walls are screwed from the bottom to the floor. By removing the screws and wedging the wall replacement plywood flooring slips through under the walls.
The RV Industry is a un-regulated ripoff industry due to the shoddy workmanship. Mind you the Fiberglass RV industry does a much better job at a higher cost.
__________________
2014 Ram 1500 CrewCab 4x4 5.7 Hemi 3.92 Rear and Air Lift 1000
2005 Jayco Jay Feather LGT - 29Y GVWR-7000 lbs.
Dexter Axle Lift 4-9/16" - installed with sub-frame.
Pro Series 1200 lbs. WDH with Double Sway Bar.
Champion 3100/2800 watt Inverter/Generator-Onboard Solar Power
|
|
|
|
|
04-21-2021, 12:11 PM
|
#10
|
|
Junior Member
Join Date: Apr 2019
Location: Boston
Posts: 9
|
Thank you both for the tips!
I did not know they'd send the drawings so I will definitely be contacting Jayco! I've been taking a lot of pictures to help with putting things back together but the drawings I'm guessing might not only help with that but also as I take more stuff apart. Definitely great that you caught the damage while still under warranty!
And thanks for the heads up about the seals. I'm wondering if that's what happened because of the amount of damage. As I get in there I'll definitely keep that in mind.
I go back and forth about cutting my losses and trying to sell just because of the amount of time this will likely take (taking extra time into consideration since this type of thing is very much out of my element). It will be a couple of days before I have some more time to work on it so who knows... It seems like the market is crazy enough right now someone might be (crazy enough) to take this on.
Thanks again all. I'll report back with any updates - and questions!
-Michelle
|
|
|
|
|
04-28-2021, 02:19 PM
|
#11
|
|
Senior Member
Join Date: Sep 2016
Location: Burleson
Posts: 537
|
I know I'm a little late here but there are links to my floor replacement in my sig. If the pics don't work shoot me a message with your email and i can send the document over.
Looks like you've got a great start though!!!
|
|
|
|
|
04-28-2021, 02:32 PM
|
#12
|
|
Junior Member
Join Date: Apr 2019
Location: Boston
Posts: 9
|
Thank you, Scott. Definitely not late to the party lol. Haven't had the time to get back at it but it's the only thing on the agenda for this weekend. Hoping to make a lot of progress! Your repair looks amazing!!
What type of insulation did you use to replace the old? Was it the same type of styrofoam filler?
Thanks!
Michelle
|
|
|
|
|
04-28-2021, 02:39 PM
|
#13
|
|
Senior Member
Join Date: Sep 2016
Location: Burleson
Posts: 537
|
We have a place here called StarR Foam that can cut the foam into any shape size you want. I forgot the R value but yes, it was the same as what came in it. The biggest part is to remember that some glues will melt some foam insulations. I made that mistake when I used the StaBond E183 Glue on the pink foam insulation. It does just fine on the regular white foam though.
|
|
|
|
|
05-08-2021, 11:59 AM
|
#14
|
|
Senior Member
Join Date: Mar 2020
Location: NEWNAN
Posts: 236
|
I did the complete floor in my 165 sport last year, I put about 150 hours in doing it, my damage was out in the floor so I left the walls and worked from there. https://www.jaycoowners.com/forums/f...ild-74202.html
|
|
|
|
|
05-18-2021, 08:12 AM
|
#15
|
|
Junior Member
Join Date: Apr 2019
Location: Boston
Posts: 9
|
Greg58 - Amazing job and thanks for sharing.
Did you need to remove/replace the toilet flange? I can't seem to figure out how to remove it. I'll post picks below.
|
|
|
|
|
05-18-2021, 08:56 AM
|
#16
|
|
Junior Member
Join Date: Apr 2019
Location: Boston
Posts: 9
|
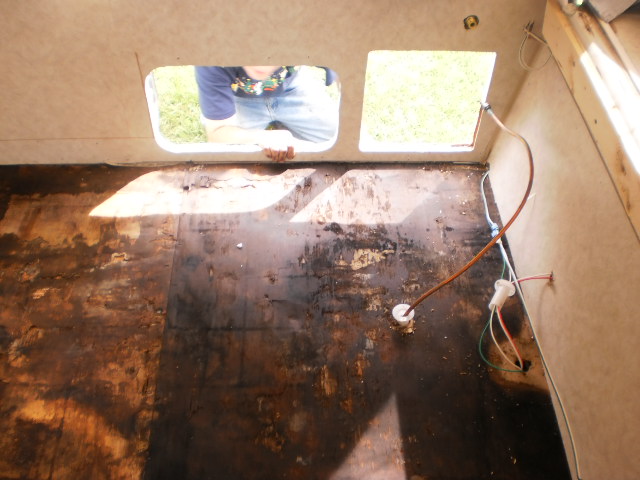
Thanks for all the replies. Finally had a window to spend a little more time on this. Was able to get the wall down - which was basically held together by a ton of staples like others have mentioned. In my head I was thinking it was something that could be taken out in a single piece but that was definitely not the case.
At this point I've decided to (as much as I can) not tear out any further and just replace what's exposed. I just don't have the time (and definitely not the expertise!) to go full nelly on this.
I was hoping for a few bits of advice based on that. First, any clues on how to remove the toilet flange? When I removed the screws I found it had a small piece cracked off so it definitely needs to be replaced but it would also make it easier to remove the floor. I can lift it up maybe an inch but it won't come off. Does it screw on? (I've tried turn it but it doesn't budge).


Also, I'm really trying to avoid removing the bottom layer of luan. It seems like if I do, then I'd need to remove the black "protective" covering on the bottom and I really wouldn't know what to do then. The luan is all dried out but it's now pretty brittle. I was thinking of trying a wood hardener and/or a wood filler on it. Any thoughts on that? Or is this really a terrible idea? The lack of any support in the middle scares me. I was able to find some styrofoam to use so that is good news but I'm afraid there just won't be enough support to when I glue this all back together. Pic below is earlier on (before tearing more of the floor out) where you can see the metal beam and then the 2x4 - there's nothing across to the other side.

Any thoughts appreciated. This is definitely way worse than I thought would be (it always is right?).
Thank you!!
|
|
|
|
|
05-18-2021, 09:31 AM
|
#17
|
|
Senior Member
Join Date: Sep 2016
Location: Burleson
Posts: 537
|
It's ton of work but you are getting there!!! Don't let it get you down.
You are correct about having to replace the water barrier if you remove the bottom luan. Which means unbolting the walls from the frame, jacking it up and putting a new barrier in. Then getting it sealed is a new worry.
Keep up the good work!
|
|
|
|
|
05-18-2021, 09:40 AM
|
#18
|
|
Senior Member
Join Date: Aug 2020
Location: Charleston
Posts: 419
|
Quote:
Originally Posted by jprs31

Thanks for all the replies. Finally had a window to spend a little more time on this. Was able to get the wall down - which was basically held together by a ton of staples like others have mentioned. In my head I was thinking it was something that could be taken out in a single piece but that was definitely not the case.
At this point I've decided to (as much as I can) not tear out any further and just replace what's exposed. I just don't have the time (and definitely not the expertise!) to go full nelly on this.
I was hoping for a few bits of advice based on that. First, any clues on how to remove the toilet flange? When I removed the screws I found it had a small piece cracked off so it definitely needs to be replaced but it would also make it easier to remove the floor. I can lift it up maybe an inch but it won't come off. Does it screw on? (I've tried turn it but it doesn't budge).
Also, I'm really trying to avoid removing the bottom layer of luan. It seems like if I do, then I'd need to remove the black "protective" covering on the bottom and I really wouldn't know what to do then. The luan is all dried out but it's now pretty brittle. I was thinking of trying a wood hardener and/or a wood filler on it. Any thoughts on that? Or is this really a terrible idea? The lack of any support in the middle scares me. I was able to find some styrofoam to use so that is good news but I'm afraid there just won't be enough support to when I glue this all back together. Pic below is earlier on (before tearing more of the floor out) where you can see the metal beam and then the 2x4 - there's nothing across to the other side.
Any thoughts appreciated. This is definitely way worse than I thought would be (it always is right?).
Thank you!! |
Flange is most likely glued on and would have to be carefully chipped of, unless you can cut it off from underneath after removing the floor. Then youd need a coupler and a new flange and small length of pipe to put it back, glue coupler on and then pipe, let it stick thru the floor and then once floor in place youll need to cut it off and glue the flange in place
. Where there are seams, where the woods butts up to each other you need to reinforce so the edges are hanging in the air, preferably a 2x6 if there is room that runs frame rail to frame rail or something like that. If you can cut to a metal cross beam on the frame and butt wood together there it will be much stronger.
Hopefully other will comment and provide other options too.
__________________
Velocity Blue 2020 F-250 XLT Crew Cab with Short Bed (bought 12/30/2020)
2021 Jay Flight 28BHS (bought 11/14/2020)
E4-10k Equalizer Hitch
Furrion Vision S 7 Rear and Side View Cameras
|
|
|
|
|
05-18-2021, 10:34 AM
|
#19
|
|
Senior Member
Join Date: May 2012
Location: Minnesota
Posts: 9,782
|
You do have a big task on your hands!
As to remove the flange. I have not done it in my TT, but I suspect you will want a Jones-Stephen PVC Socket Saver. I have used a smaller sized one on some below grade work. It was not pretty, but it passed the pressure test.
https://www.amazon.com/PlumBest-J443...93&s=hi&sr=1-1
|
|
|
|
|
05-21-2021, 12:46 PM
|
#20
|
|
Senior Member
Join Date: Jun 2013
Location: Lil Rhody
Posts: 160
|
If you do not have clear access to the top of the tank or to see how the toilet flange is attached you should leave it alone. There is a toilet flange repair kit available so you can bolt the toilet back down. LINK: https://www.amazon.com/Toilet-Flange.../dp/B078HGCYYJ
When I replaced the black tank in my 28.5RKS the toilet plumbing was all glued in and the flange was installed from the top. I had at least 18" of vertical access so I was able to cut the pipe and then re-join it with a Fernco coupling. I have pictures of the project on here in the repair section.
__________________
SteveB
2004 Jayco JayFlight 285RKS 5th Wheel
2001 Dodge Ram (SOLD)
2015 RAM 3500 CTD

|
|
|
|
|
|
 Posting Rules
|
You may not post new threads
You may not post replies
You may not post attachments
You may not edit your posts
HTML code is Off
|
|
|
|
 » Recent Threads
 |
|
|
|
|
|
|
|
|
|
|
|
|
|
|
|
|
|
|
|
|
|
|
|
|
|
|
|
|
|
|
|
|
|
|
|
|
|
|
|
|
|


 Linear Mode

