 |
|
 09-16-2017, 07:28 PM
|
#1
|
|
Moderator Emeritus
Join Date: Apr 2011
Location: Michigan
Posts: 9,424
|
2018 Jay Flight 24RBS Mods
Retired the 2005 Eagle 278FBS and took delivery last week of a 2018 Jay Flight 24RBS. Spent 12 years upgrading the '05' Eagle now I get to start all over with the 24RBS.
The 24RBS base unit floor plan:
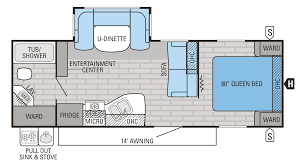
I ordered the 24RBS with the optional table/4-chairs knowing that I would only be using 2 chairs. I planned on relocating the table/chairs thus allowing some wiggle room for a Lazy Boy wall hugger recliner which would be much more comfortable then the small sofa during extended stay travel.
Next spring I plan on looking for a different dining table with a radius drop-leaf that will allow a little better access for the second chair around the table. I reused the same four screws to anchor the table table in it's new location and did the same with the chair(s) anchor straps. I'm considering using the extra anchor straps from the chairs I removed for the recliner...., but may not need them.


The base 24RBS came with an outside stove/sink that was a pullout style, and it also had a shelf but wasn't very user friendly considering all the open inaccessible space above it.
I don't use outside kitchens and planned to utilize the space for additional outside cargo storage. My '05' Eagle had a similar outside cargo space that I stored items I used on a daily/regular basis and used the pass-thru storage area for items not used as frequently.
I removed the stove/sink drawer assembly after disconnecting all the water/drain/LP lines......., actually a fairly simple task. The difficult task was removing the shelf, it's like they built the trailer around it!
Once the area was cleared out and and all the connecting supply lines cap, I installed a plastic 3-drawer unit and a couple of other devices to support/contain my "stuff".
This new storage area is located to the rear of the trailer, so I did anchor some of the main storage devices. The 3-drawer unit I screwed in place and used Velcro to keep the drawers from taking flight. Other items where placed such that they couldn't move around.


Bob 
__________________

2016 GM 2500HD 6.0L/4.10
2018 Jay Flight 24RBS
2002 GM 2500HD 6.0L/4:10 (retired)
2005 Jayco Eagle 278FBS (retired)
1999 Jayco Eagle 246FB (retired)
Reese HP Dual Cam (Strait-Line)
|

|

|
|
09-17-2017, 05:43 AM
|
#2
|
|
Site Team
Join Date: Nov 2010
Location: Virginia`s Eastern Shore
Posts: 17,093
|
Wow, converting that outside kitchen created a huge storage space! I like that Lazy boy too.
__________________
2017 Coachmen Catalina 283RKS
2018 Ford F250 Super Duty 6.2l CCSB
2010 Jayflight 28BHS (sold)
|
|
|
|
|
09-17-2017, 06:08 AM
|
#3
|
|
Moderator Emeritus
Join Date: Oct 2012
Location: Cape Coral, Florida
Posts: 4,797
|
Looks good Bob. I may have to convert that kitchen.
I wish I had the recliner :-)
Doug
__________________

Cape Coral, Florida
2021 Toyota Tundra SR5, 5.7 V8
2022 Jayco 240RBS
|
|
|
|
|
09-17-2017, 06:15 AM
|
#4
|
|
Senior Member
Join Date: Jul 2016
Posts: 857
|
That's my kind of thinking, Bob. I would do the same with this model. Kind of makes us itch for this TT! I like the access to the plumbing.

|
|
|
|
|
09-17-2017, 08:37 AM
|
#5
|
|
Senior Member
Join Date: Dec 2012
Location: Southern Indiana
Posts: 3,209
|
Quote:
Originally Posted by Rustic Eagle

Retired the 2005 Eagle 278FBS and took delivery last week of a 2018 Jay Flight 24RBS. Spent 12 years upgrading the '05' Eagle now I get to start all over with the 24RBS.
The 24RBS base unit floor plan:

I ordered the 24RBS with the optional table/4-chairs knowing that I would only be using 2 chairs. I planned on relocating the table/chairs thus allowing some wiggle room for a Lazy Boy wall hugger recliner which would be much more comfortable then the small sofa during extended stay travel.
Next spring I plan on looking for a different dining table with a radius drop-leaf that will allow a little better access for the second chair around the table. I reused the same four screws to anchor the table table in it's new location |
Ok Bob you really got the hamster running the wheel in my brain. Our Eagle has 2 nice recliners in the back and I have to move one to the entry way to retract the main slide and it's getting to be a real PITA. Our unit came with the table and 4 chairs and I removed 2 chairs a couple of years ago. Our main slide has a smallish couch and the table with 2 chairs. I'm wondering if I "corner" the table how much room I would have to put the recliner in there. Gonna go measure today. I'm wondering though how the slide would react with the extra weight. Thanks for the idea. Terry
__________________
2012 Eagle 320 RLDS
2017 Ford F-250 FX4 Crew STX 6.2l
3.73 E-locker
|
|
|
|
|
09-17-2017, 09:26 AM
|
#6
|
|
Moderator Emeritus
Join Date: Apr 2011
Location: Michigan
Posts: 9,424
|
Quote:
Originally Posted by TCNashville
snip...... I'm wondering though how the slide would react with the extra weight. Thanks for the idea. Terry
|
Terry,
The one thing I like about the Lazy Boy brand is that the back of the chair is removable, it's a narrow chair, and lighter then most. I also placed a small throw rug under the chair's metal frame to minimize wear of the TT's carpet.
Later today with the slide retracted I'm going to measure the distance from the main floor to the bottom leading edge of the slide floor then take a pool noodle (or some other material) to act as a wedge the full length of slide floor edge. This will support the slide floor effectively when retracted and/or during travel. I put a "noodle reminder" near the slide open/close switch.
I planned on doing this anyway because it's to easy to mistaking step on the edge of the slide floor with the slide retracted.
Just completed installing my hardwired EMS (removed from my 05 Eagle), again a straight forward R&R. Removed the junction box and basically placed the EMS in same area.


Bob
__________________
2016 GM 2500HD 6.0L/4.10
2018 Jay Flight 24RBS
2002 GM 2500HD 6.0L/4:10 (retired)
2005 Jayco Eagle 278FBS (retired)
1999 Jayco Eagle 246FB (retired)
Reese HP Dual Cam (Strait-Line)
|
|
|
|
|
09-17-2017, 09:38 AM
|
#7
|
|
Moderator Emeritus
Join Date: Apr 2011
Location: Michigan
Posts: 9,424
|
Quote:
Originally Posted by Doug
Looks good Bob. I may have to convert that kitchen.....snip
|
Doug,
I had considered installing removable peg board along the back wall spaced out from the plumbing, but with the rear TT location things tend to bounce off the metal hangers, we tried it on my BIL's Rockwood. I had a peg board setup in my '05' Eagle but that storage space was over the axles thus I didn't have any movement issues.
There are a lot of plastic storage container and kitchen coatedwire space savers out there....., plus a couple screws/roll of Velcro (non-stick) works great 
Bob
__________________
2016 GM 2500HD 6.0L/4.10
2018 Jay Flight 24RBS
2002 GM 2500HD 6.0L/4:10 (retired)
2005 Jayco Eagle 278FBS (retired)
1999 Jayco Eagle 246FB (retired)
Reese HP Dual Cam (Strait-Line)
|
|
|
|
|
09-17-2017, 05:36 PM
|
#8
|
|
Moderator Emeritus
Join Date: Apr 2011
Location: Michigan
Posts: 9,424
|
I checked off a few other tasks by days end.
1. Eterna Bond Tape Seal Front Cap/Roof seam.
2. Installed Detachable shore power connector.
3. Installed hinged MaxxAir cover.
4. Completed mounting of Reese Dual Cam (thru bolt grade 8 w/backer plate) &
longer HD Safety Chains (gold). The Jayco OEM chains are a little snug for my
TV's OEM receiver style/location...., will have to cut off the Jayco chains later.


Nice clean "white" roof......, for now!


Plus some minor stuff....: Moved the Solar Ready connector behind the E-brake switch rather then the other way around......, water pump base had only two screws in a four screw mount so added the missing two....., LP regulator was facing toward the TT so remounted it facing forward.
Bob
__________________
2016 GM 2500HD 6.0L/4.10
2018 Jay Flight 24RBS
2002 GM 2500HD 6.0L/4:10 (retired)
2005 Jayco Eagle 278FBS (retired)
1999 Jayco Eagle 246FB (retired)
Reese HP Dual Cam (Strait-Line)
|
|
|
|
|
09-17-2017, 07:13 PM
|
#9
|
|
Senior Member
Join Date: Jul 2016
Posts: 857
|
Very nice and impressive - You are a man on a mission! I am getting inspired!
I have some questions: You ran 6" across the cap/roof seam, but what did you run along the side? Is that 4"? I am preparing to do my roof/wall edges all the way down and the roof/rear wall seam; I am not sure if I should use 6" or 4" for those runs. I already put 6" across the front, like yours. I was thinking that I would run 4" down the roof/wall edges and across the rear wall. What do you think?
Also, does your Flight have the black Quad sealant along the front and rear corners, where the roof membrane meets the walls? If so, did you Eternabond over the Quad? It looks like you did. I added some Quad to ours, but I am thinking I will Eternabond over it, too. The Quad product does loosen and crack some over time. Jayco seems to use it on the Flights and Feathers quite a bit (on the roof corners). Thank you!
|
|
|
|
|
09-17-2017, 07:41 PM
|
#10
|
|
Moderator Emeritus
Join Date: Oct 2012
Location: Cape Coral, Florida
Posts: 4,797
|
Ah, Eternabond tape on the front edge of roof. Another add to my list.
I feel like a slug Bob, you've got all your mods done in the 1st week lol.
Thanks for sharing,
Doug
__________________
Cape Coral, Florida
2021 Toyota Tundra SR5, 5.7 V8
2022 Jayco 240RBS
|
|
|
|
|
09-17-2017, 07:44 PM
|
#11
|
|
Site Team
Join Date: Nov 2010
Location: Virginia`s Eastern Shore
Posts: 17,093
|
Quote:
Originally Posted by Doug
Ah, Eternabond tape on the front edge of roof. Another add to my list.
I feel like a slug Bob, you've got all your mods done in the 1st week lol.
Thanks for sharing,
Doug
|
Bob does them while camping, lol.
|
|
|
|
|
09-18-2017, 09:29 AM
|
#12
|
|
Senior Member
Join Date: Jun 2016
Location: Mechanicsville
Posts: 1,479
|
Where is the shore power connection inside your TT? I have a 23RB. Do you know if they are in the same general area. How hard was it to get to the inside electrical connections and make the change?
Quote:
Originally Posted by Rustic Eagle
I checked off a few other tasks by days end.
1. Eterna Bond Tape Seal Front Cap/Roof seam.
2. Installed Detachable shore power connector.
3. Installed hinged MaxxAir cover.
4. Completed mounting of Reese Dual Cam (thru bolt grade 8 w/backer plate) &
longer HD Safety Chains (gold). The Jayco OEM chains are a little snug for my
TV's OEM receiver style/location...., will have to cut off the Jayco chains later.


Nice clean "white" roof......, for now!


Plus some minor stuff....: Moved the Solar Ready connector behind the E-brake switch rather then the other way around......, water pump base had only two screws in a four screw mount so added the missing two....., LP regulator was facing toward the TT so remounted it facing forward.
Bob |
__________________
Erroll and Mary Doss and Duffy (RIP)
2018 Jayco Redhawk 22J
2014 F150 SC, 4x4, HD Pkg, Sterling Gray
|
|
|
|
|
09-18-2017, 12:26 PM
|
#13
|
|
Moderator Emeritus
Join Date: Apr 2011
Location: Michigan
Posts: 9,424
|
Quote:
Originally Posted by FeatherFam
snip....... You ran 6" across the cap/roof seam, but what did you run along the side? Is that 4"?
|
Actually I use 4" Enternabond on all my applications, I ran two 4" tape strips along the roof/cap seam "overlapping them" about 1 1/2. This allowed for the existing caulking width inconsistencies and gave better coverage over the roof/cap surface.
I've found working with 4" tape is more manageable, 6" tape I would need three hands. IMO 4" tape along the roof/rear wall would work fine.
Quote:
Originally Posted by FeatherFam
snip......did you Eternabond over the Quad? It looks like you did....snip
|
Yes, I did apply Enternabond over the front two "Quad Sealant" corners which also covered the 'ends' of the 4" Eternabond tape.
Bob
__________________
2016 GM 2500HD 6.0L/4.10
2018 Jay Flight 24RBS
2002 GM 2500HD 6.0L/4:10 (retired)
2005 Jayco Eagle 278FBS (retired)
1999 Jayco Eagle 246FB (retired)
Reese HP Dual Cam (Strait-Line)
|
|
|
|
|
09-18-2017, 12:42 PM
|
#14
|
|
Moderator Emeritus
Join Date: Apr 2011
Location: Michigan
Posts: 9,424
|
Quote:
Originally Posted by Atlee
Where is the shore power connection inside your TT? I have a 23RB. Do you know if they are in the same general area. How hard was it to get to the inside electrical connections and make the change?
|
If you are referring to the "detachable shore power" project, you don't have to 'disconnect' the OEM 30A cord from inside the TT, everything is done from outside the TT.
Basically all you do is pull the 30A cord all the way out and cut the cord 12"-18" out from the exterior wall,... then you work applying the supplied hardware to the two cut ends of the OEM 30A cord. You will be removing the existing plastic cord housing/lid from the outside wall, the kit provides new metal plates that line-up with the 3 existing holes (reuse original screws).
Bob
__________________
2016 GM 2500HD 6.0L/4.10
2018 Jay Flight 24RBS
2002 GM 2500HD 6.0L/4:10 (retired)
2005 Jayco Eagle 278FBS (retired)
1999 Jayco Eagle 246FB (retired)
Reese HP Dual Cam (Strait-Line)
|
|
|
|
|
09-18-2017, 12:44 PM
|
#15
|
|
Moderator Emeritus
Join Date: Apr 2011
Location: Michigan
Posts: 9,424
|
Quote:
Originally Posted by Crabman
Bob does them while camping, lol.
|
Ahh, doesn't feel like work when camping
Special Note:
Jayco uses a rubber type gasket (seal) around their window frames which I'm not a fan of, I would have preferred Butyl Tape which is much more effective. For added protection I ran a bead of clear silicone caulking along the top of the rubber window frame seal and down 2" each side of the window frame. This way water can't work it's way in from the top.
Bob
__________________
2016 GM 2500HD 6.0L/4.10
2018 Jay Flight 24RBS
2002 GM 2500HD 6.0L/4:10 (retired)
2005 Jayco Eagle 278FBS (retired)
1999 Jayco Eagle 246FB (retired)
Reese HP Dual Cam (Strait-Line)
|
|
|
|
|
09-18-2017, 08:34 PM
|
#16
|
|
Senior Member
Join Date: Jun 2016
Location: Mechanicsville
Posts: 1,479
|
Thanks for the reply and help. That may be my next project. What part does one look for when buying the detachable plug kit?
Quote:
Originally Posted by Rustic Eagle
If you are referring to the "detachable shore power" project, you don't have to 'disconnect' the OEM 30A cord from inside the TT, everything is done from outside the TT.
Basically all you do is pull the 30A cord all the way out and cut the cord 12"-18" out from the exterior wall,... then you work applying the supplied hardware to the two cut ends of the OEM 30A cord. You will be removing the existing plastic cord housing/lid from the outside wall, the kit provides new metal plates that line-up with the 3 existing holes (reuse original screws).
Bob |
__________________
Erroll and Mary Doss and Duffy (RIP)
2018 Jayco Redhawk 22J
2014 F150 SC, 4x4, HD Pkg, Sterling Gray
|
|
|
|
|
09-18-2017, 08:40 PM
|
#17
|
|
Moderator Emeritus
Join Date: Oct 2012
Location: Cape Coral, Florida
Posts: 4,797
|
https://www.amazon.com/Marinco-30ARV...hable+cord+kit
Quote:
Originally Posted by Atlee
Thanks for the reply and help. That may be my next project. What part does one look for when buying the detachable plug kit?
|
__________________
Cape Coral, Florida
2021 Toyota Tundra SR5, 5.7 V8
2022 Jayco 240RBS
|
|
|
|
|
09-19-2017, 06:52 PM
|
#18
|
|
Senior Member
Join Date: Jun 2016
Location: Mechanicsville
Posts: 1,479
|
Thanks.
Quote:
Originally Posted by Doug
|
__________________
Erroll and Mary Doss and Duffy (RIP)
2018 Jayco Redhawk 22J
2014 F150 SC, 4x4, HD Pkg, Sterling Gray
|
|
|
|
|
09-19-2017, 10:21 PM
|
#19
|
|
Senior Member
Join Date: Nov 2014
Location: New Hampshire
Posts: 609
|
Quote:
Originally Posted by Rustic Eagle
Actually I use 4" Enternabond on all my applications, I ran two 4" tape strips along the roof/cap seam "overlapping them" about 1 1/2. This allowed for the existing caulking width inconsistencies and gave better coverage over the roof ...snip |
Bob, that's a real clean looking eterna bond application. My recent project saw my scissors gumming up with eterna-adhesive, and my lines got crooked.
Did you use any primer solvent? I read once that light application of mineral spirits helped the tape grab. I'm considering running a line down the edges of the roof, just above the gutter. Do you have any advice?
Thanks
Craig Bailey
New Hampshire
Jayflight 32 BHDS
Chevy 2500HD CC
__________________
Craig T. Bailey
Hudson, NH
2015 Jayflight 32BHDS
2018 Chevy 3500HD Crew 4x4 Duramax
|
|
|
|
|
09-19-2017, 11:07 PM
|
#20
|
|
Moderator Emeritus
Join Date: Apr 2011
Location: Michigan
Posts: 9,424
|
Craig,
I use a razor knife for cutting/trimming the tape, and depending on the size of the project may have to change out the blade.
As far as surface prep, I usually start out with a good Dawn soapy wash with a brush/cloth, rinse, and let dry. After washing, and prior to applying the sealer tape, you can use a Eternabond Prime product. I have used lacquer thinner applied sparingly to a clean rag wiping over the roof/cap surface following immediately with a clean damp (water) cloth....., let the surface dry.
The key to the application of the sealer tape is "roller pressure" over the tape, this is what activates the adhesive. This is the type of roller I use:

I found the 4" wide tape manageable and I work it over the surface with my fingers to minimize air pockets. Also, cutting the tape to length prior to application helps.
I personally haven't seen the need to run Eternabond along the length of my TT's in the past, I just maintain a good bead of clear silicone caulk along the top edge of the gutter rail.
But, my BIL mentioned last week that he intends to apply a 4" wide Enternabond run the full length (both sides) of his FW using the top edge of the gutter rail as his tape application contact guide. His reason is to protect the radius roofing material from tree branches due to the height of FW's.
Bob
__________________
2016 GM 2500HD 6.0L/4.10
2018 Jay Flight 24RBS
2002 GM 2500HD 6.0L/4:10 (retired)
2005 Jayco Eagle 278FBS (retired)
1999 Jayco Eagle 246FB (retired)
Reese HP Dual Cam (Strait-Line)
|
|
|
|
|
|
 Posting Rules
|
You may not post new threads
You may not post replies
You may not post attachments
You may not edit your posts
HTML code is Off
|
|
|
|
 » Recent Threads
 |
|
|
|
|
|
|
|
|
|
|
|
|
|
|
|
|
|
|
|
|
|
|
|
|
|
|
|
|
|
|
|
|
|
|
|
|
|
|
|
|
|


 Linear Mode

