 |
|
 08-23-2018, 01:47 PM
|
#1
|
|
Senior Member
Join Date: Sep 2010
Location: Fresno
Posts: 205
|
27RLS Solar Project
Im going to be installing 360 watts (2x180w panels) on the roof of my 27RLS. Right now Im getting all my materials together and planning. Ive removed everything from the front storage compartment and have also removed my propane tanks up front for room to work. This is a list of what I will be using: - Two 180 watt Grape Solar Panels
- Bogart Engineering SC2030 Charge Controller
- Bogart Engineering TM2030 Battery Monitor
- 500 amp Deltec Shunt
- Blue Sea Systems Battery Switch
- Fused pullout AC Disconnect
- Samlex PST-300-12 Inverter
- Two Crown CR235 Six Volt Batteries
- Century Plastics Dual 6 Volt Battery Box
- 6 AWG Welding Cable from roof combiner box to controller
- 2/0 AWG Welding Cable from controller to batteries
- Temco Industrial Stainless Steel Panel Mounts
- Miscellaneous hardware and wiring
I have pretty much everything right now except the wiring and mounts which are being shipped today. A friend of mine is coming with his welder this weekend and we will reposition the existing battery box rails, as they sit there is not enough vertical clearance at the rear because of the tall 6 volt batteries. I have created an album and will update it and this post as I go along. The album is https://www.jaycoowners.com/forums/m...lbums1689.html
__________________
Tom & Jill Williams
2015 Jayco Jay Flight 27RLS
2017 Ford F-250 4X4 Crew Cab 6.7L Diesel 3.55 E-Locker
|

|

|
|
08-25-2018, 10:43 PM
|
#2
|
|
Senior Member
Join Date: Sep 2010
Location: Fresno
Posts: 205
|
__________________
Tom & Jill Williams
2015 Jayco Jay Flight 27RLS
2017 Ford F-250 4X4 Crew Cab 6.7L Diesel 3.55 E-Locker
|
|
|
|
|
08-26-2018, 06:32 AM
|
#3
|
|
Site Team
Join Date: Nov 2012
Location: Clearwater, FL area
Posts: 5,196
|
NICE JOB!!!
Keep the pictures coming, and welcome to the SOLAR community
Don
My Registry
RVing with SOLAR
|
|
|
|
|
08-26-2018, 09:04 AM
|
#4
|
|
Senior Member
Join Date: Jun 2016
Location: Indiana
Posts: 1,424
|
Nice work! I just upgraded my older contoller to the newer Bluetooth version. Its cool to have so much usage and data information on my tablet and phone now. Im not smart enough yet to know what it all means yet. Still think a Tri-Metric is in my future though.
__________________
1999 Suburban 2500 4x4
2016 Jayflight 23RB Elite, Fiberglass, Polar Package
400w Renogy RV solar kit w/ Bluetooth, 100w Renogy solar suitcase
430 amp/hr 6v battery bank
1000w Renogy hard wired inverter
2011 F350 Lariat, DWR 4x4, 6.7 turbo diesel
2017 Open Range, Mesa Ridge 374BHS
|
|
|
|
|
08-26-2018, 09:42 AM
|
#5
|
|
Senior Member
Join Date: Aug 2015
Location: kaml
Posts: 1,285
|
Quote:
Originally Posted by Screwby

Nice work! I just upgraded my older contoller to the newer Bluetooth version. Its cool to have so much usage and data information on my tablet and phone now. Im not smart enough yet to know what it all means yet. Still think a Tri-Metric is in my future though.
|
Which charge controller? Bogart?
To the OP: why only a 300w inverter?
|
|
|
|
|
08-26-2018, 08:48 PM
|
#6
|
|
Senior Member
Join Date: Jun 2016
Location: Indiana
Posts: 1,424
|
Quote:
Originally Posted by PlayersZ28
Which charge controller? Bogart?
To the OP: why only a 300w inverter?
|
The Renogy Adventurer is the controller I’m using. I had their older version, works just fine, but didn’t utilize their new Bluetooth dongle. I think they are upgrading most of their controllers to do so. You get a lot of data (I’m still deciphering most lol) and it’s cool to see the volts, amps, Watts, daily totals, and battery charge condition from my devices. You can tweak your setup and change charging and equipment parameters from your tablet or phone now with the new setup. It has about a 50’ Range for the Bluetooth so I’ve been known to check the solar system while sitting in traffic from the rig just for fun
__________________
1999 Suburban 2500 4x4
2016 Jayflight 23RB Elite, Fiberglass, Polar Package
400w Renogy RV solar kit w/ Bluetooth, 100w Renogy solar suitcase
430 amp/hr 6v battery bank
1000w Renogy hard wired inverter
2011 F350 Lariat, DWR 4x4, 6.7 turbo diesel
2017 Open Range, Mesa Ridge 374BHS
|
|
|
|
|
08-27-2018, 05:30 AM
|
#7
|
|
Senior Member
Join Date: Aug 2015
Location: kaml
Posts: 1,285
|
Quote:
Originally Posted by Screwby
The Renogy Adventurer is the controller I’m using. I had their older version, works just fine, but didn’t utilize their new Bluetooth dongle. I think they are upgrading most of their controllers to do so. You get a lot of data (I’m still deciphering most lol) and it’s cool to see the volts, amps, Watts, daily totals, and battery charge condition from my devices. You can tweak your setup and change charging and equipment parameters from your tablet or phone now with the new setup. It has about a 50’ Range for the Bluetooth so I’ve been known to check the solar system while sitting in traffic from the rig just for fun
|
I have a Renogy 4210 installed right now. I was looking at the new Rover controller with the BT interface. I currently have an Arduino tied into the RS232 data port that I programmed to support a touch screen in the trailer where I can monitor the system. It looks like the new units put out a lot more data over either BT or ModBus. I'll look at the Adventurer.
Edit: Just looked up the Adventurer. It's PWM and I need MPPT.
|
|
|
|
|
08-27-2018, 06:13 AM
|
#8
|
|
Site Team
Join Date: Nov 2012
Location: Clearwater, FL area
Posts: 5,196
|
I have been enjoying the Wi-Fi capabilities of checking my SOLAR while driving, around the CG and when at home, anywhere on the internet with my internet, since I installed SOLAR back in 2012. That was one of the main reasons I went with the MorningStar TS60, MPPT SOLAR charge controller, and it was 60 amps for future SOLAR additions that I never needed. 250 watts met our needs.
It also saves about 90 days of data in the controller, which is in a spreadsheet display and downloads into Excel.
Don
My Registry
RVing with SOLAR
|
|
|
|
|
08-27-2018, 07:05 AM
|
#9
|
|
Senior Member
Join Date: Jun 2016
Location: Indiana
Posts: 1,424
|
The only thing that annoys me is the controllers display of battery voltage and percentage. The new one and old one will show voltage drop and massive percentage drop if a load is on the system. I called Renogy and they explained (somewhat) that the battery voltage and percentage displayed isn’t actually what the bank has? Example, I’ll boondock and use a 120v item on an inverter, the battery voltage will drop from 12.8 to 12.3 until I turn off the item. Sometimes my battery percentage will display as low as 68% and show it’s charging even when not in use but then be 100% an hour later. Like I said, still learning...here are shots of display so far today on shore power at 8am in Pensacola
__________________
1999 Suburban 2500 4x4
2016 Jayflight 23RB Elite, Fiberglass, Polar Package
400w Renogy RV solar kit w/ Bluetooth, 100w Renogy solar suitcase
430 amp/hr 6v battery bank
1000w Renogy hard wired inverter
2011 F350 Lariat, DWR 4x4, 6.7 turbo diesel
2017 Open Range, Mesa Ridge 374BHS
|
|
|
|
|
08-28-2018, 10:16 AM
|
#10
|
|
Senior Member
Join Date: Sep 2010
Location: Fresno
Posts: 205
|
Quote:
|
To the OP: why only a 300w inverter?
|
Right now I only intend to use the inverter to power the TV, DVD player, iPhone chargers, iPad chargers, and a tower fan. In the future if I decide to power other things Ill upgrade to a larger inverter.
__________________
Tom & Jill Williams
2015 Jayco Jay Flight 27RLS
2017 Ford F-250 4X4 Crew Cab 6.7L Diesel 3.55 E-Locker
|
|
|
|
|
08-28-2018, 11:15 AM
|
#11
|
|
Senior Member
Join Date: Sep 2010
Location: Fresno
Posts: 205
|
Well, I havent posted on the status of the project in a few days, weve been attacking it and trying to get it finished. After I ran the wires for the TriMetric battery monitor, I started work on the inverter wiring. I decided to put the inverter in the cabinet under the entertainment center because that will be its main function, running the TV and DVD player along with charging iPhones and iPads. The cabinet conveniently backs up agaist the side storage compartment so I ran the wires through the wall into the compartment.  Here is the view from the compartment side.  The wires then run behind the panel in the compartment and go through the floor alongside the water heater gas line  I then ran them forward through existing grommets in two cross frame rails to the front cross frame where I drilled two holes and inserted grommets. From there the wires run up into the front pass through storage area to the solar controller panel.  To the left of the inverter wires are the wires to the TriMetric battery monitor on the opposite side of the trailer. The most difficult part of this stage of wiring was getting access for the wires under the trailer. It was a pain loosening and lowering the corrugated plastic panel that covers the underside of the trailer. I have to replace some of the spray foam that I needed to remove to get the panel down.
__________________
Tom & Jill Williams
2015 Jayco Jay Flight 27RLS
2017 Ford F-250 4X4 Crew Cab 6.7L Diesel 3.55 E-Locker
|
|
|
|
|
08-28-2018, 12:22 PM
|
#12
|
|
Site Team
Join Date: Nov 2012
Location: Clearwater, FL area
Posts: 5,196
|
Very NICE!!!
One question.... how long is the 12Volt run from the inverter to the batteries?
Just curious
Don
My Registry
RVing with SOLAR
|
|
|
|
|
08-28-2018, 01:54 PM
|
#13
|
|
Senior Member
Join Date: Sep 2010
Location: Fresno
Posts: 205
|
Quote:
Originally Posted by Mustang65
Very NICE!!!
One question.... how long is the 12Volt run from the inverter to the batteries?
Just curious
Don
My Registry
RVing with SOLAR |
The run is about 12-1/2 feet of 6 AWG welding cable. If I eventually go to a larger inverter, I’ll mount it right at the solar controller panel.
__________________
Tom & Jill Williams
2015 Jayco Jay Flight 27RLS
2017 Ford F-250 4X4 Crew Cab 6.7L Diesel 3.55 E-Locker
|
|
|
|
|
08-28-2018, 03:30 PM
|
#14
|
|
Senior Member
Join Date: Sep 2010
Location: Fresno
Posts: 205
|
I apologize for not having many in-progress pictures, but we were in a time crunch to get it done before my buddy had to leave. The first task to complete was relocate the battery box support rails a couple of inches forward so the rear of the box would clear the trailer. That went pretty good, with the help of a cut off saw, MIG welder and angle grinders. Here is the box in its new position with the batteries in place

We then turned to mounting the panels. I had purchased three sets of mounts for two panels so that I could have a third mount on each side of the panels since they are pretty long. I purchased stainless steel mounts from Temco Industrial which raise the panel three inches above the roof to help in heat dissipation. We moved the mounts and redrilled mount holes to try and get at least two sets of mounts on each panel to land on a truss. We marked the holes, pre-drilled the holes and then placed a blob of Dicor at each hole. We then placed the mount feet back down and tightened down the mounting screws. I then covered each mounting foot with Dicor.   At the same time we were on the roof we mounted the combiner box. I used a Carlon 4x4x2 PVC box and I found bus bars that were pre-mounted on a piece of angled metal. We used the mounting holes on the angle to mount the bus bars and box to the roof. Dicor was placed around the roof penetrations and under and around the box.   The wires to the rear panel were secured to the roof with 4x4 squares of Eternabond Tape
 Next post Ill upload the rest of the pics after I clean up the wiring a bit 
__________________
Tom & Jill Williams
2015 Jayco Jay Flight 27RLS
2017 Ford F-250 4X4 Crew Cab 6.7L Diesel 3.55 E-Locker
|
|
|
|
|
08-28-2018, 03:55 PM
|
#15
|
|
Senior Member
Join Date: Aug 2015
Location: kaml
Posts: 1,285
|
The part I like about having solar is coming back to the RV after being away for most of that day and finding a fully charged battery pack while friends are starting genny's 
We have 640w & 4x 6v AGM's.
|
|
|
|
|
08-28-2018, 05:19 PM
|
#16
|
|
Senior Member
Join Date: Jun 2016
Location: Indiana
Posts: 1,424
|
Quote:
Originally Posted by PlayersZ28
The part I like about having solar is coming back to the RV after being away for most of that day and finding a fully charged battery pack while friends are starting genny's
We have 640w & 4x 6v AGM's. |
Absolutely! Not being worried about having somewhere to plug in unless you need AC (then the generator gets a turn) is awesome. 
__________________
1999 Suburban 2500 4x4
2016 Jayflight 23RB Elite, Fiberglass, Polar Package
400w Renogy RV solar kit w/ Bluetooth, 100w Renogy solar suitcase
430 amp/hr 6v battery bank
1000w Renogy hard wired inverter
2011 F350 Lariat, DWR 4x4, 6.7 turbo diesel
2017 Open Range, Mesa Ridge 374BHS
|
|
|
|
|
08-30-2018, 10:32 PM
|
#17
|
|
Senior Member
Join Date: Sep 2010
Location: Fresno
Posts: 205
|
Ok, on the last post we had finished up on the roof. We drilled individual holes for the positive and negative cables through the roof into the street side wardrobe cabinet ceiling

From there the cables will run across the cabinet ceiling and then down the wall where they will go through the bottom of the cabinet to the nightstand below. From there they will pass through holes to the solar controller panel directly below.

The cables in the cabinet were put into a split wire loom and secured with cable clamps.

From the bottom of the cabinet to the nightstand top I used Wiremold corner molding.

Directly below the street side nightstand is the solar controller panel, this is where everything is tied together.

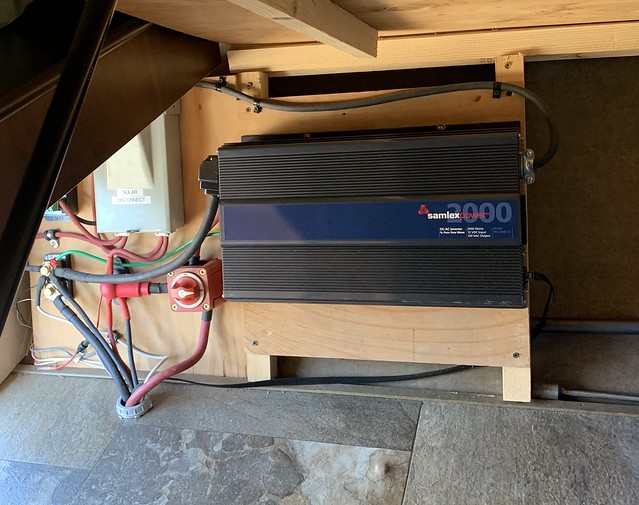
The two cables at the top are coming from the roof. The positive cable goes to one pole of the fused pullout AC disconnect and then to the solar input of the Bogart SC2030 controller. The negative lead goes directly to the controller and from the output of the controller to the load side of the shunt. The positive output goes back to the other pole of the AC disconnect and then to the positive power post. Using the two pole fused pullout AC disconnect allows me to isolate the controller from both the panels and the battery bank by pulling out the disconnect blade. The black 6 awg cable coming up from the floor is the negative lead from the inverter going to the load side of the shunt. The red 6 awg cable from the floor is the inverter positive lead. The white 8awg wire going to the load side of the shunt is the chassis ground. The black 6 awg cable with the red shrink wrap is the positive lead to the existing trailer circuit breaker on the front cross frame. The small wires at the bottom are the communication and power wires to the TriMetric Battery Monitor. The black and red 2/0 awg cables are going to the battery bank. The positive power post is isolated from the positive battery cable by a battery switch so I can turn off all loads to the battery when in storage. Because Im using a small 300 watt inverter, I elected to use a 100 amp battery post mounted fuse from Samlex as my catastrophic fuse.
We had some angle iron left over so my buddy welded up a frame that covers the lid of the battery box. He is going to use some steel strap and fabricate a piece that will go around the frame top and bottom and will be able to lock the lid closed.

Well, that about wraps up,the project, the system is working well. The real test, will come when we go out camping and see how well we recover each day from the previous nights battery usage. If you have any questions, let me know.
__________________
Tom & Jill Williams
2015 Jayco Jay Flight 27RLS
2017 Ford F-250 4X4 Crew Cab 6.7L Diesel 3.55 E-Locker
|
|
|
|
|
08-31-2018, 10:20 AM
|
#18
|
|
Member
Join Date: Aug 2018
Location: Richmond, TX
Posts: 39
|
Quote:
Originally Posted by tbwill
At the same time we were on the roof we mounted the combiner box. I used a Carlon 4x4x2 PVC box and I found bus bars that were pre-mounted on a piece of angled metal. We used the mounting holes on the angle to mount the bus bars and box to the roof. Dicor was placed around the roof penetrations and under and around the box.
|
Just a note of caution, I don't see any isolation between the bus bar and that angle mount. Therefore those screws poking down into your roof are connected to the bus bar...and are thus hot. Not usually a problem with low voltage stuff unless something you screwed into is conductive. May be a problem if you get moisture in the roof somewhere. There may also be some ventilation ducting with foil tape in there, so be careful.
You may also want to put some sealant on those screws too in case water leaks into and fills up the box from the cable entries or lid seal. I build a lot of outdoor equipment with tons of junction boxes, and I can't tell you the number of times I've opened a box to have water sloshing inside or pour out the when I crack the seal.
__________________
2019 White Hawk 26RK
2018 F150 SuperCrew 3.5 EcoBoost
Blue Ox Sway Pro 1000lb WDH

|
|
|
|
|
04-20-2021, 06:06 PM
|
#19
|
|
Senior Member
Join Date: Sep 2010
Location: Fresno
Posts: 205
|
__________________
Tom & Jill Williams
2015 Jayco Jay Flight 27RLS
2017 Ford F-250 4X4 Crew Cab 6.7L Diesel 3.55 E-Locker
|
|
|
|
|
04-20-2021, 07:54 PM
|
#20
|
|
Senior Member
Join Date: Feb 2018
Location: Forest
Posts: 178
|
Nice. I am starting my solar adventure this Spring on my 5th wheel. Nice write as I will definitely be referring to it. Anything you would have done different 2 years later than the upgrades you recently made?
__________________
2013 Ford F-350 Lariat 6.7 Diesel SW Crew Cab
2017 Jayco 325BHQS
PullRite SuperGlide 3300
|
|
|
|
|
|
 Posting Rules
|
You may not post new threads
You may not post replies
You may not post attachments
You may not edit your posts
HTML code is Off
|
|
|
|
 » Recent Threads
 |
|
|
|
|
|
|
|
|
|
|
|
|
|
|
|
|
|
|
|
|
|
|
|
|
|
|
|
|
|
|
|
|
|
|
|
|
|
|
|
|
|


 The wires were then fished through the wall into the pantry and run under one of the shelves to the back corner. They then drop down to the bottom and run along the plumbing to the bathroom
 From the bathroom they go through the floor at the low point drains and then through the frame and up to the front with an existing 12v wire bundle


 Linear Mode

