 |
 06-11-2020, 02:23 PM
|
#1
|
|
Junior Member
Join Date: Jun 2020
Location: Dacono
Posts: 10
|
Remove running light for backup camera?
I've searched and found several threads about installation of a backup camera by tapping into the backup lights or a running light, but I'm not clear on how to properly remove the running light (I'd prefer to tap into the center running light so that I can use the camera as a rear view while driving (I've already confirmed that I can keep the running lights illuminated by keeping my parking lights turned on)).
I have a new 2020 Jay Flight SLX 7 174BH (no camera prewiring)
I've inspected the running lights and don't see anything that looks like a lens release clip or screw. I assume that the process would involve removing the lens, which would presumably provide access to screws which would then be removed to allow for the light housing to be released from the body of the trailer?
Normally I'd just start prying at things, but the dealer mentioned that all of the exterior lights on these are now sealed LEDs, and I don't want to break anything, especially just before shoving off for a larger trip in a week and a half.
Thanks for any advice you have!
|

|

|
|
06-11-2020, 02:39 PM
|
#2
|
|
Senior Member
Join Date: May 2013
Location: SE Wisconsin
Posts: 3,431
|
You should be able to just pry the lens off with a small screwdriver. There usually is little slot for one but not always. The base of the light is mounted with 2 screws.
If you drive a GM and have fog lights, turning them on will also turn on the running lights. Then when you shut it off all the lights will shut off automatically. You won't have to manually turn off the running lights.
__________________
Chuck
2013 Jayco Jayfeather X20 E (sold)
2016 Chevy Silverado LTZ 2 Z71 Crew Cab (sold, and dearly missed)

|
|
|
|
|
06-11-2020, 02:43 PM
|
#3
|
|
Senior Member
Join Date: Mar 2017
Location: Wolverine
Posts: 707
|
I have a different model Jayco than you but mine is a 2016 with what I believe to be LED bulbs. I popped the cap off, if I recall correctly, and tapped into the power source.  
__________________
Jerry B.
"Stateboy" (Formerly "36fire412")
SW Lower Michigan
2016 X254
2012 Toyota Tundra Crewmax TRD 4x4
|
|
|
|
|
06-11-2020, 03:00 PM
|
#4
|
|
Junior Member
Join Date: Jun 2020
Location: Dacono
Posts: 10
|
Thanks! I did see what appears to be the tiniest potential slot that a small screwdriver might fit into, but was too timid to try. I'll give it a try and report back (the trailer is in storage right now, but we'll be pulling it home for another round of loading and misc work on it soon).
|
|
|
|
|
06-11-2020, 03:01 PM
|
#5
|
|
Junior Member
Join Date: Jun 2020
Location: Dacono
Posts: 10
|
I assume that I'll want to recaulk the housing when I put it back on. It looks like Jayco uses a standard clear silicone caulk?
|
|
|
|
|
06-11-2020, 03:27 PM
|
#6
|
|
Senior Member
Join Date: Nov 2011
Location: Where ever the boss says we're going.
Posts: 16,111
|
Quote:
Originally Posted by crberus

I assume that I'll want to recaulk the housing when I put it back on. It looks like Jayco uses a standard clear silicone caulk?
|
Clear GeoCel or Quad Seal
__________________
 DISNEY LOVERS
|
|
|
|
|
06-11-2020, 04:30 PM
|
#7
|
|
Site Team
Join Date: Jan 2011
Location: James Island, SC
Posts: 22,859
|
If I were doing that mod, I believe I would keep the middle running light as stateboy did, and mount it as he did.
It looks cleaner and you won't have to have friends telling you that a running light is out for the rest of your life! LOL
__________________
 Moderator Moderator
2011- 351RLTS Eagle, MorRyde suspension/pin box,
2017- F350 6.7 PSD Lariat FX4,SRW, SB,CC
Hughes PWD SP-50A, TST TPMS
Gator roll-up bed cover
B&W Turnover ball, Companion Std hitch
Can't find what you're looking on JOF? Try Jayco Owners Forum Custom Google Search
|
|
|
|
|
06-11-2020, 04:46 PM
|
#8
|
|
Junior Member
Join Date: Jun 2020
Location: Dacono
Posts: 10
|
Quote:
Originally Posted by Grumpy
Clear GeoCel or Quad Seal
|
Thanks!
|
|
|
|
|
06-11-2020, 04:48 PM
|
#9
|
|
Junior Member
Join Date: Jun 2020
Location: Dacono
Posts: 10
|
Quote:
Originally Posted by norty1
If I were doing that mod, I believe I would keep the middle running light as stateboy did, and mount it as he did.
It looks cleaner and you won't have to have friends telling you that a running light is out for the rest of your life! LOL
|
Hahaha, thanks -- I hadn't thought of that; I was going to put it directly below, but I completely see how that could welcome ongoing feedback and false concerns!
|
|
|
|
|
06-11-2020, 06:12 PM
|
#10
|
|
Senior Member
Join Date: Mar 2017
Location: Wolverine
Posts: 707
|
Quote:
Originally Posted by norty1
If I were doing that mod, I believe I would keep the middle running light as stateboy did, and mount it as he did...
|
I went this route to avoid the glare I thought I might get if the camera sat directly above or below a clearance light. I also opted to go the the passenger side of the center light to get a better view of the lane I would be trying to merge back into. I normally travel in the right lane and wanted to be able to get back there after completing a pass.
__________________
Jerry B.
"Stateboy" (Formerly "36fire412")
SW Lower Michigan
2016 X254
2012 Toyota Tundra Crewmax TRD 4x4
|
|
|
|
|
06-12-2020, 05:55 AM
|
#11
|
|
Senior Member
Join Date: Feb 2017
Location: Dallas
Posts: 4,281
|
Hardest part for me was the wiring. 10 miles of wiring Jayco had in there plus the wiring from the camera wasn't easy stuffing back into the hole. I went high so I could screw directly into wood. No glare from the light 
__________________
Tight Lines and accurate shots
|
|
|
|
|
06-21-2020, 11:14 PM
|
#12
|
|
Junior Member
Join Date: Jun 2020
Location: Dacono
Posts: 10
|
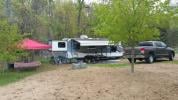
Thank you all - the install was successful!
Thanks everyone for the help -- I completed the installation today (unfortunately last weekend had a couple of unanticipated conflicts, so I had too delay).
For anyone in the future that is curious, the following information provided above was super helpful: - The light cover/lens indeed pops off of the housing using a flathead screwdriver (from the bottom in my case)
- The resulting housing (and attached LED PCB) is attached by two screws as expected
I've included pictures since they're worth a thousand words. But in summary, here's what it took to get it installed: - Lighly ran a box knife around the caulk seam
- Using a small, flathead screwdriver, pried the lens up from a small indent in the center bottom of the lens housing
- After freeing the lens from the remaining caulk, the light housing was easily removed by removing the two screws
- The light/PCB was connected via red and white leads, and slack was easily pulled out for splicing
- Cut both leads and using wire crimps, spliced in the camera's supplied power connector
- Dremeled and smoothed a rounded hole from center base of the housing and reattached allowing the camera's power lead to hang
- Had to Dremel and smooth a similar hole in the lens to fit and clip around the housing and new power lead properly
- Caulked around the whole mess to seal it up
- Finished the bracket and camera install, caulking it thoroughly as well
Some additional notes on placement: based on the previous suggestions, I decided to locate the camera between the center and center right running lights. The manufacturer's installation instructions recommended installing it so that part of the antenna cleared the top the trailer for improved reception; which I did -- so far, the picture and motion response seem very good.
Thanks again to the folks above that provided all the helpful feedback!
|
|
|
|
|
06-22-2020, 06:16 AM
|
#13
|
|
Senior Member
Join Date: Mar 2017
Location: Wolverine
Posts: 707
|
Looks great!
__________________
Jerry B.
"Stateboy" (Formerly "36fire412")
SW Lower Michigan
2016 X254
2012 Toyota Tundra Crewmax TRD 4x4
|
|
|
|
|
06-22-2020, 06:38 AM
|
#14
|
|
Senior Member
Join Date: Apr 2020
Location: Jefferson
Posts: 209
|
Looks good.
__________________
Happy Camping!
Andy, Sherrie, Dixie, and Daisy
2020 Jayco 336FBOK Modern Farmhouse
2020 Chevy Silverado 2500 SRW Duramax 10 speed GM/ Allison
CURT Q20 on R20 Slider
|
|
|
|
|
 Posting Rules
|
You may not post new threads
You may not post replies
You may not post attachments
You may not edit your posts
HTML code is Off
|
|
|
|
 » Recent Threads
 |
|
|
|
|
|
|
|
|
|
|
|
|
|
|
|
|
|
|
|
|
|
|
|
|
|
|
|
|
|
|
|
|
|
|
|
|
|
|
|
|
|


 Linear Mode

